Rhubarb Crumble

rhubarb crumble
Our neighbor has successfully fended the deer off her garden and accordingly bestowed an armful of rhubarb stalks on us the other day (yeah, twist my arm). So when I spotted a rhubarb recipe on Food Blogga, Triple Berry Rhubarb Crisp, I immediately sent it Lisl’s way since she is the crumble queen in this household. Part of the confusion over name comes from nationality issues — what Americans call a crisp, the Aussies and Brits call a crumble (the topping usually has oatmeal, brown sugar and butter, and sometimes nuts).

I was assigned the task of putting together the crisp topping. That is about as close as Lisl will let me get to baking, since I am normally unable to follow cooking directions without veering off into new directions (or over the cliff). We were missing shredded coconut, almonds, and ground ginger, but replaced the almonds with walnuts and the result still came out great.

Lisl also had to do an ingredient swap, as we discovered we did not have corn starch in the kitchen, so she used a very small amount of flour. The fruit filling ended up a little more runny than Lisl wanted, but that was purely an aesthetic issue — the taste was fabulous, and went perfectly with some vanilla ice cream.

I won’t elaborate on my own food experiment tonight. Let’s just say that surely even Richard Blais had disasters on his way to discovering great new flavor combinations! That’s what I’m going to tell myself anyway.

Peas in a Pod


Today was one of those up-crack-of-dawn at work mayhem days, followed by a slew of family errands, so a nice dinner was definitely not in the cards. Still, I was able to pause for a moment or two with my three year old and teach her the fine art of eating sugar snap peas.

When I was little, I loved to crack open the pea pods and nibble out the peas — a fabulous confluence of tactile and taste. It was fun to see Audrey happily sitting up on her chair eating peas with Daddy and enjoying the fruits (dare I say vegetables?) of sharing and discovery. And of course, when patience runs short with pod cracking, there’s always the crunch crunch crunch of downing the whole thing!

Shrimp and Bacon Tortilla Rolls

Shrimp Rolls
Tonight I decided to try an experiment of stuffed shrimp, bacon and cheese tortilla rolls. The following amounts made about 12 rolls.

40 medium-sized shrimp (cleaned and de-veined)
6 strips of thickly cut bacon
2 shallots
two handfuls of fresh cilantro
1/3 pound of monterey jack or cheddar cheese
2 limes
Black pepper
12 flour tortillas (6″ in diameter)
Canola Oil
Wooden toothpicks

1. In a large frying pan, cook your bacon until it is cooked but not yet crispy. Remove to a plate with a piece of paper towel to soak up excess grease.

2. In the bacon fat and while the pan is still quite hot, saute your shrimp cooking both sides for a minute or two until the shrimp loses its translucency. Remove from pan, loosely chop, and place in a medium bowl.

3. Finely chop the shallots and saute in the bacon fat on low heat for a couple minutes until they start to turn translucent. Remove and add to bowl (pour out any extra bacon fat that comes with the shallots). Then chop up your bacon and add to bowl.

4. Loosely chop up your cilantro (can never have too much fresh cilantro in my opinion) and add to bowl. Chop your cheese into small cubes (1/4 inch) and add to bowl. Finally add a touch of freshly ground pepper and the juice of a lime, and mix all the ingredients together.

5. Before you create your rolls, you want to warm up the tortillas so that they don’t split during the rolling process. At burrito shops, I have seen them use a kind of steamer, but at home I just warm them one at a time in a medium sized frying pan big enough to hold the 6″ tortilla, on low heat.

6. Take a warmed tortilla, and add a couple spoonfuls of the mixture to the bottom third. Fold over the bottom, then fold in the two sides, then continue the rolling process with the sides tucked in. Try to keep it fairly tight, and once you have complete the roll process, keep the shape in place with two wooden toothpicks (the toothpicks are essential, or the rolls will unravel when you cook them – in the bottom picture you can see the holes where the toothpicks went).

7. In a medium saucepan, heat up about an inch or two of canola oil until very hot. Add your tortilla rolls in batches and cook until they turn golden brown. Remove the tortillas with a slotted spoon or pair of tongs, and place on paper towel to pick up excess oil.

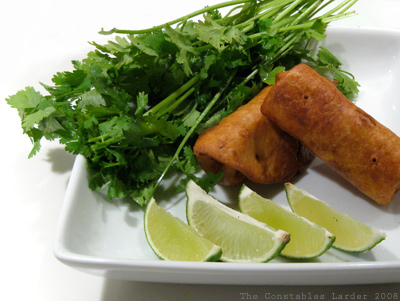
8. Remove the toothpicks and serve with slices of fresh lime

Notes: The next time I try this, I want to try to get my hands on some Chinese spring roll wrappers which would be thinner than the tortillas (which have the advantage of being available in most supermarkets). You can also experiment with creating a dipping sauce — I can imagine continuing in the lime/cilantro vein or going in a sour cream/yogurt direction. Lastly, the next time I do it, I might try not chopping ingredients as much but rather layering them more neatly in the rolls (thin strips of bacon and cheese, for example, and leaving the shrimp whole).

Shrimp Rolls

Pasta sauce with homemade milled tomatoes

Tomato Sauce
A few months ago, some friends of ours from Harrison, NY, gave us a jar of homemade stewed tomatoes. Apparently every year, a group of Italian women in the neighborhood (our friend’s mother being one) buy a huge quantity of tomatoes, mill them to de-seed and de-skin, stew, and then preserve in sterilized glass jars with a sprig of basil. Note: I’m hoping to get a more detailed description of this process to post in the next day or so (Update: description posted here).

On Monday evening we decided to crack open the jar and taste. I can only describe my taste bud reaction as “holy moly!” It had to be the sweetest tomato flavor I’ve ever had. Well, after this moment, my goal could only be to use this as the base for a pasta sauce without distracting too much from the incredible core flavor.

1 jar of stewed tomatoes (see below)
1 vidallia onion, chopped
1 and a half stalks of celery, chopped
2 cloves of garlic
8 oz white button mushrooms, cleaned and sliced
handful of parsley, washed and chopped
virgin olive oil
salt and pepper

I started by heating some olive oil in a big pot on low heat, and then sauteing the onions and garlic until the onions started to turn translucent. I then added the mushrooms and sauted, stirring occasionally, until the mushrooms were cooked and exuding their juices. I tossed in the parsley and celery, a pinch of salt and some ground pepper (I kept the salt light because the natural flavor of the tomatoes was so good), and let cook for a couple more minutes.

Normally I would also add wine or vermouth at this stage but it just wasn’t needed here. I then added the tomatos, turned up the heat slightly to bring everything to a light simmer, and cooked for about 30-60 minutes stirring regularly. We served this with farfalle pasta (campanelle would have worked nicely too) and a d’Arenberg Footbolt Shiraz.

Now, the tomato sauce we used as a base is obviously not something you can run out and get. Normally I use tins of peeled Italian tomatoes, and to be honest I rarely take the step to deseed the tomatoes (usually due to time considerations). Jamie Oliver also tends to leave the seeds in, and takes the approach of letting the tomatoes cook whole (i.e. he does not cut or break them up) with the sauce for a while and only breaking them up and letting the seeds out into the mix near the very end.

Many cookbooks talk about how tomato seeds can add slight bitterness. I had never really felt this to be enough of a problem to take the time, but if you want to try working with canned, peeled Italian tomatoes without the seeds, it’s a relatively easy, if slightly messy, step. To preserve most of the juices, I recommend working in your sink with a strainer over a bowl. Take each tomato, break it open in the middle with your fingers (they will be very soft), and let the seeds run out, gently scooping out any recalcitrant ones. Let the juices flow into the bowl, save the tomato flesh (can just put in the same bowl), and toss out the seeds in the strainer.

Cole Slaw – just lemon, and hold the sugar!

Cole Slaw recipe
Summer picnics often mean cole slaw, but I’ll come right out and say that I hate most American cole slaw, primarily because of the insistence on making it sweet, not to mention the overload of mayonnaise. Bleaghh! (now you get to guess what sound I am intending when I wrote that word)

In my mind, a great cole slaw is a simple one. I inherited this simple recipe from my parents, and I’ve never run across a superior recipe. This is exactly what we made for a family 4th of July gathering yesterday:

1 green cabbage
4 lemons
2-3 carrots (or 1 really big one)
big handful of parsley
salt & pepper
Mayonnaise (Ed. I typically just use Hellmann’s, although my understanding from Lisl is that Aussie’s definition of mayo is a bit different so I’m not sure what a good off-the-shelf equivalent would be outside of the US)

With a long chef’s knife (8″ or longer), shred the cabbage as thin as you can (don’t be afraid to chop it up a little more if you feel your shredding job is a bit too chunky). Place in a large bowl. Peel your carrots, discarding the outside peelings, and then using the peeler, cut long, thin strips of carrot turning the carrot in your hand as you go so you are working all around the carrot’s circumference. Depending on the carrot, you may want to discard the woody inside core. I usually then quickly chop up the peelings a bit so that no piece is longer than an inch or two. Add the carrot to the bowl, as well as finely chopped parsely.

Squeeze the juice of 4 lemons into the bowl (can always increase or decrease number of lemons to taste). Halve or quarter the lemons and then squeeze into your free hand, keeping your fingers close enough together that you can catch and discard any lemon pits. Add a light amount of salt and pepper.

Estimating the amount of mayo is a “feel” thing that depends on how much you love mayo. I tend to err on the lighter side, but for a full cabbage this still ends of being between 4 and 6 big tablespoons. The key is to mix and taste as you go (like salt, you can’t really pull it *out* of the dish once in). You can also add more salt and pepper to your taste in this step.

The result is a fresh and tasty cole slaw that goes great with a barbecue meal (which is exactly what we did). I’ve also done this recipe with dill instead of parsely and liked the results.

For an interesting and different take on cole slaw, check out the Lime and Peanut recipe over at 101 Cookbooks.

P.S. the scallop shells in the picture have nothing to do with the dish, they just happened to be on the table as the girls had been collecting shells on the beach earlier.