Vegetarian Chili

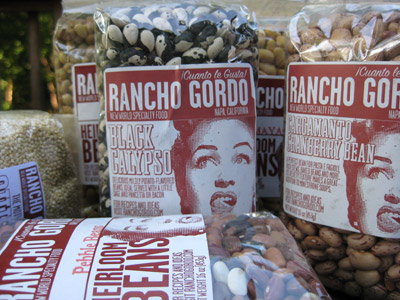
The first project with my Rancho Gordo beans was a vegetarian chili using some of the fresh vegetables from the farm stand. This is another “get it all in the pot and let it cook for a while” dish. For this project, I used the Pebble beans, and of course you can use other, more commonly found beans (a common mix is kidney, pinto and great northern). The colors were a wonderful mix of browns and oranges — it was like Fall in a pot.

Vegetarian Chili

Serves 4 – 6, depending on bowl size 😉

1 lb pebble beans (or other bean mixture)
3 medium tomatoes
7 or 8 tomatilloes
2 red hot chili peppers
2 hot cayenne peppers (if available, otherwise use red chili peppers or jalapenos)
2 ears of corn (1 for chili, 1 for garnish)
2 onions (1 left whole, 1 chopped)
4 scallions, chopped
4 cloves of garlic, minced
2 bay leaves
2 tbsp ground cumin
2 tbsp fresh oregano, chopped (or half as much dried oregano)
salt
cilantro
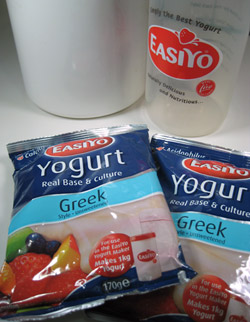
natural greek yogurt

chili - ingredients
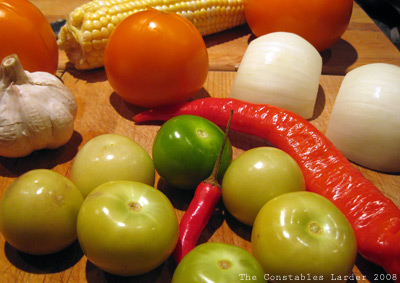
Just a few of the ingredients
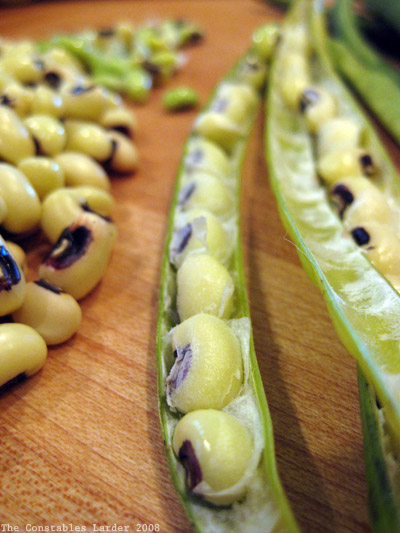
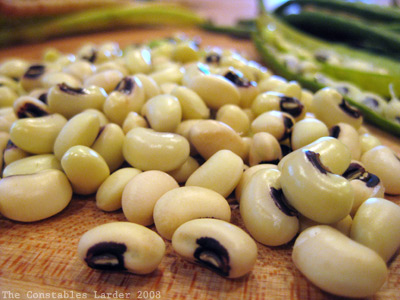
Prepping the beans
Rinse and quickly pick over the beans to remove cracked beans or small stones. Soaking is optional (just requires longer cooking), but beans are easier to digest if you bring them to a boil for a couple of minutes, then turn off the heat to let them soak for over an hour. When done soaking, drain and rinse in a collander.

chili - beans
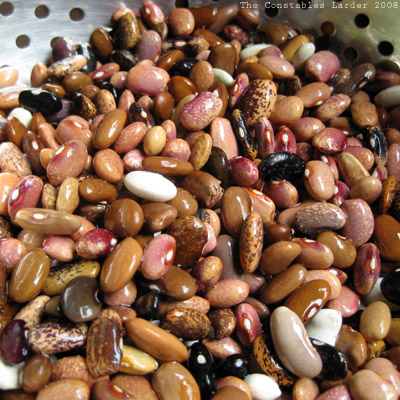
Rinsed Pebble beans, pre-soaking

Cooking the beans
Peel off the roughest outer layers of an onion and poke a few holes in it with a knife, making one large enough to insert a bay leaf. Place the rinsed beans and onion in a heavy bottomed pot (I like using my cast iron dutch oven), fill with cold water about an inch over the tops of the beans, and bring to a boil. Once the water is boiling, reduce to a simmer and cook for 45 minutes or so. Save at least 4 cups of the cooking liquid, and then drain the rest, putting the beans to the side in a bowl.
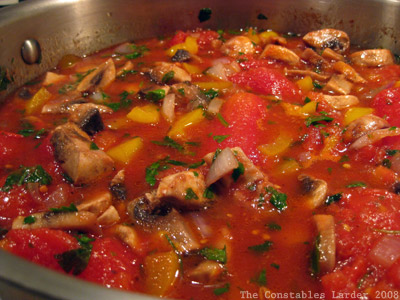
Cooking the Chili
Preheat the oven to 280F.

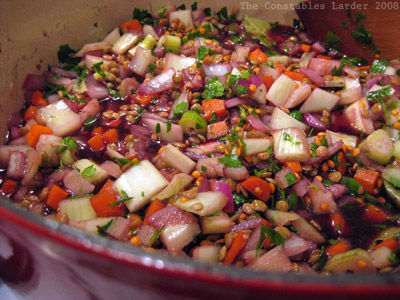
Chop up the onion and scallions, mince the garlic, and saute in the dutch oven on medium-low heat with a little bit of olive oil. If you have time to skin and de-seed your tomatoes, do so, then roughly chop them up and add to the pot. Remove the husks from the tomatilloes, dice, and add to the pot. Cut the kernels of an uncooked ear of corn and add to the pot. Add the oregano and ground cumin, 2 tsp of salt, and 2 of the hot peppers, minced. Finally add in the beans and a cup of the bean-cooking liquid, and mix it all together gently. As you will see in the below picture, I also kept and added the whole onion from cooking the beans.

Cover and place in the oven.

chili - cooking

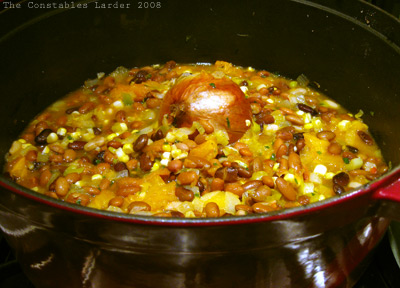
At this point, you can cook on low heat for as long as you have (or can bear), but at least another hour. Check every 30 – 45 minutes and add more of the bean-cooking liquid if it is looking dry. I probably ended up adding at least two cups of liquid. About an hour in, I removed the whole onion and added a fresh bay leaf. Continue to taste for the desired balance of cumin, salt and heat from the fresh peppers, and adjust accordingly. I used 2 red chili peppers and 2 fresh cayenne peppers, but with fresh peppers heat can really vary so treat carefully if you have a sensitive palate. When you add more heat, let it cook until your next checkpoint before tasting again and adding.

Depending on your desired texture and aesthetics, if you want to thicken up the chili, put one or two large spoonfuls of the chili in a food processor and roughly puree, then stir back into pot. (Note: it isn’t quite as pretty if you do this, but you do a get a wonderfully thick “comfort food” texture.)

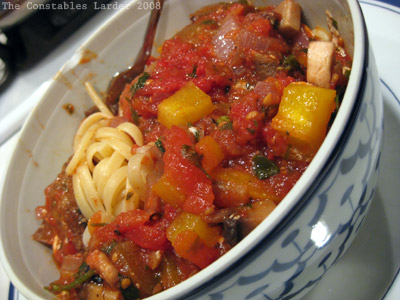
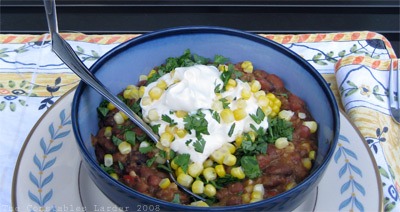
Before serving, chop up some fresh cilantro and cook an ear of corn (method of cooking is of no matter – I microwaved it still in the husk for 2.5 minutes) and cut off the kernels. Add a dollop of yogurt (or sour cream) to each bowl and garnish with the fresh corn kernels and cilantro. Other nice garnishes are diced sweet red pepper, grated cheese, and diced red onion. It can be fun to serve each garnish in an individual bowl so your eaters can take their pick.

chili - served

Additional notes:
Using the oven isn’t necessary, but I find that it reduces any risk of burning at the bottom of the pot (a handy thing if you get tied up by, say, a mischevous 3 year old and forget to check on it for a bit) and makes it easier to keep the chili at a low simmer. In my case, I actually started the chili yesterday evening and left it in the oven with the heat turned off when I went to bed (while placing the extra bean-cooking liquid in the fridge). When I woke up, I added some more liquid to the pot, brought it all to a boil again on the top of the stove, and then placed back in the oven for a few more hours.

If you don’t have fresh hot peppers, you can use chili powder, but remember to start light (say, a tsp or two) and build up to the desired heat level, and you might also scale back the garlic, cumin, and oregano since chili powder is a mix of spices.

Finally, those of you who have been reading this blog are picking up that I am more about country/peasant/comfort food than haute cuisine. While I had to resist mightily from adding any meat to this chili dish, it came together well and was a filling and truly delicious meal.

On Elizabeth David; Recipe Links 8-30-08

cookbooks
Last Sunday and today, I’ve enjoyed flipping through classic old Elizabeth David cookbooks over a cup of tea. She brought French and Mediterranean cooking to the Brits after World War II and has a wonderful, informal style (albeit a bit parsimonious with her words when describing recipes). She had a delightful habit of mercilessly chiding her countrymen and women for atrocious cooking habits (these books were written in the early 1950s).

Among other things, she rails against the obsession over the relatively new (at the time) “deep freeze” technology and the popularity of artificial flavourings at the expense of fresh, seasonal food. Given that I’m currently reading The Omnivore’s Dilemma (and San Francisco is currently hosting the Slow Food festival) the message reverberates. It is interesting to see how long it has taken for the pendulum to start swinging back to “natural” here in the US in a broad way. It takes a lot to get people to change, especially under the onslaught of marketing messages.

These two quotes caught my eye today from David’s cookbooks, and made me smile:

“Nobody has ever been able to find out why the English regard a glass of wine added to a soup or stew as a reckless foreign extravagance and at the same time spend pounds on bottled sauces, gravy powders, soup cuves, ketchups and artificial flavourings.” (she then has a footnote that details out the horrific ways some artificial flavourings are created — from French Country Cooking, pub 1951)

“How one learns to dread the season for salads in England. What becomes of the heart of the lettuce? What makes an English cook think that beetroot spreading its hideous purple dye over a sardine and a spoonful of tinned baked beans constitutes an hors d’oeuvre? Why make the cold salmon, woolly enough anyhow by mid-summer, look even less appetizing than it is by serving it on a bed of lettuce leaves apparently rescued from the dust bin? What is the object of spending so much money on cucumbers, tomatoes, and lettuces because of their valuable vitamins, and then drowning them in vinegar and chemical salad dressings?” (from Summer Cooking, pub 1955)

As Homer Simpson would say… “doh!”

Now on to recipe links! Here are some of the recipes I’ve seen from food bloggers over the last several weeks that caught my eye and I want to remember for a future day:

P.S. I might not make desserts (that’s Lisl’s territory), but all you Daring Bakers are sure making great-looking eclairs right now!

Drunk Lamb and Lentil Braise

lamb braise

When my friend John gave me two Mark Bittman cookbooks (I retaliated by giving him the Dean & Deluca cookbook and Jamie Oliver’s Naked Chef), I was looking forward to expanding my stylistic horizons through The Best Recipes in the World. Needless to say, John nearly fell over laughing when I told him that the first recipe I tried from the cookbook was… French. Gee, way to wander from your norm! Well, I didn’t have bloody pasilla chiles lying around John!! (but boy that recipe looked good), however I did have lentils!

This dish is like the classic daubes I learned to make from Julia Child’s Essentials of French Cooking years ago, only simpler. I changed Bittman’s recipe a fair amount to suit my purposes, but I’ll definitely credit the cookbook for reminding me of this great dish I haven’t made in a while. I called it a “drunk” braise because you sacrifice a bottle of red to the cause!

Serves 4

4 lamb loin chops (can do this recipe with beef instead if you aren’t a lamb fan)
3 medium carrots, peeled and chopped
1 onion, chopped
1 fennel bulb, chopped
3/4 lb dried green lentils (picked over to watch for small stones)
1 handful small orange lentils (optional)
1 tbsp minced garlic
3 medium bay leaves, or 2 large
1 large handful of chopped parsley
1 bottle of red wine (I used a zinfindel)
water
salt and pepper
olive oil

Preheat oven to 320F

Heat some olive oil in a dutch oven over medium high heat and sear your lamb for about 20-30 seconds each side and remove to a side plate.

In your dutch oven, bring the heat down to medium-low and saute your chopped onion and garlic until the onion starts to turn translucent, and then add the chopped carrots, fennel, parsley, lentils, bay leaf, half a tsp of salt, a few grindings of pepper, and the bottle of wine and turn up the heat until it is bubbling.

lamb braise -starting

Nestle the lamb into the mix, cover, and place in the oven for 3 to 3.5 hours. Check the pot every 45 minutes or so and very gently stir. Flip the lamb halfway through. If it is simmering a little too hard at any point, lower the heat another 15F. If the dish starts to dry out (you want it to be nicely moist), add water. I would estimate I ended up adding about a cup of water. It is also important to taste for salt — too much will ruin this dish, but too little will leave this quite flat.

I served by removing the lamb to a cutting board, and shredding the meat with two forks. I then layered it on top of the lentils and vegetables, topped with some fresh parsely. This goes well with a red wine with some body, or a dark beer.

: : :

So that’s the normal recipe. In full disclosure, I’ll note that in this particular case, I started it two nights ago and cooked it for two hours (it wasn’t going to be done in time for dinner that night), and then placed in the fridge until I was able to finish and serve it tonight. Not wanting to put my dutch oven in the fridge, I shifted everything carefully to a deep baking dish. Tonight when finishing the cooking process, I didn’t want to make more washing up so I left it all in the baking dish, covered that with aluminum foil, and cooked it for another hour and a half tonight at 280F.

I love slow, low heat cooking probably more than anything.

Geeking out with beans

Rancho Gordo
My Rancho Gordo beans came today! Let the games begin!

fresh blackeyed peas

When we dropped by Gills farm stand last weekend, they had fresh black-eyed peas. Some of the pods were really green and soft, with young, green beans that hadn’t fully developed (you can vaguely see them in the background above, out of focus). To any black-eyed pea experts out there: does that mean they were picked too soon?

fresh blackeyed peas

And Now For Something Completely Different…
Tonight my attention was starting a lamb and lentil (part of the geeking out with beans day) braise which will be finished off tomorrow when I get home from work. So for dinner we whipped together linguine with a simple tomato sauce. Once upon a time, I used to think you had to cook a tomato sauce for hours but it’s really not true. Tonight’s version took about 40 minutes and was great.
quick pasta sauce

Chop and saute an onion in olive oil, followed by chopped mushroom, sweet yellow pepper, and a whole bunch of parsley. Let it all cook for a few more minutes, then add a can of whole, peeled tomatoes with some salt and pepper. Simmer the sauce for 30 more minutes before breaking up the tomatoes into smaller chunks with a spatula. Taste for salt and serve on some al dente linguine. Fresh, simple, fast, healthy, tasty and filling. All good descriptors for a work-night meal.
linguine

Lastly, we’ve created an email for the blog for anyone who wants to contact us but doesn’t want to leave a public comment: larder -at- constable -dot- net. Pardon my spelling it out that way, but spam bots are such a scourge!

Swiss Chard Gratin, Dry Rub Pork

Anyone who reads this blog has already noticed that sometimes I get in the mood to do a recipe and heat of the oven be damned! Tonight was one of those cases after I saw an Alice Waters recipe for Swiss Chard posted by The Wednesday Chef. It had to be eaten.

But before I talk about the recipe, I had a question for you foodies out there — I know that Alice Waters inspired, well, everybody, but who do you consider was particularly influenced by her within the following generations of leading chefs ?

Swiss Chard Gratin

chard-gratin

Adapted from The Wednesday Chef who adapted from Alice Waters. This amount serves about 4 as a side dish. The use of a cast iron pan in making this dish reduces washing up!

1 bunch of swiss chard (8-10 large leaves)
1 cup breadcrumbs
unsalted butter
1 onion, diced
1 tbsp flour
1/2 to 1 cup milk
pinch of ground nutmeg

Tear up some bread and make pea-sized breadcrumbs in a food processor. Melt a tablespoon of butter in a large cast iron pan and lightly brown the breadcrumbs over medium heat. Remove and set aside in a small bowl.

Preheat oven at 350F.

Get some lightly salted water boiling in a large pot. Wash the chard and cut away the stems. Thinly chop the stems (just like chopping celery). Place the chopped stems in the boiling water and cook for two minutes, then add the green leaves of chard, and cook for another three minutes, then drain in a collander and press some of the excess moisture out of the leaves.

Add 2 tsbp of butter to your cast iron pan and saute the diced onion over medium-low heat until it turns translucent. Remove the chard from the collander, loosely chop, and add to the cast iron pan. Add some salt and continue sauteing for several minutes.

chard gratin cooking

Add the flour and stir in well. Then add 1/2 cup of milk, the pinch of nutmeg, and stir and cook for another 5 minutes. You want the mixture to be moist but not soupy, so continue to add small increments of milk as you go to keep the proper level of moisture.

Remove from heat, and taste for salt. You can optionally add a little more butter here (say 1/4 tbsp cut into small pieces and sprinkled around). Sprinkle the breadcrumbs on top evenly and place in the oven for 20 to 30 minutes.

Let’s just say that I did not leave leftovers.

Dry Rub Pork

Pork Dry Rub

I continue to experiment with dry rub combinations. Tonight I removed sugar all together and combined roughly equal portions of mustard seed, coriander seed, cumin seed, black peppercorns, and salt in a mortar for grinding. I rubbed the spice mix on the pork and let the chops sit for about 40 minutes before grilling — searing on high heat for 2 to 3 minutes a side and then moving to indirect heat on the grill for a few minutes more (these were big chops). The result was very good.

Dinner all combined was the grilled pork chop, side of chard gratin, and a side of some roma beans boiled for 2 minutes on the side and a touch of salt — all paired with a nice Malbec.

Tomato Salad; Bitten pasta recipe; photoshop irritation

Tomato Salad
Who doesn’t love summer tomatoes?

Tomato Salad
This was just sliced tomatoes with oregano, basil, salt, pepper, olive oil, and a touch of balsamic vinegar. Nothing fancy, just happiness. We served it with some bread, the pesto from yesterday, and homemade hummus (ever since reading I Found Happy’s recipe I’ve been making my own hummus… don’t know why it never occurred to me to do before!) .

Biting into Bitten
For dinner, we decided to try a recent recipe from the NYTimes Bitten blog: Pasta with Eggplant, Tomato and Breadcrumbs (click on that link for the recipe). We made it without the pancetta, but felt that it was missing something in the end result (still quite satisfying however). My own notes/changes for next time: make sure that the breadcrumbs are well browned; throw the chopped tomatoes in at the very end so that are barely cooked; experiment with lemon or cumin to punch up the flavor a bit, or drop the vegetarian angle and add the pancetta.

Pasta
Pile o’ basil

Pasta sauce
Making the sauce did make for this amazing orange (orange tomatoes) and purple combination. The lighting in the kitchen wasn’t ideal for a picture, but there was some serious color going on.

Photoshop Grrrrr
So I tried once again to edit my digital pictures on my Mac laptop (which I use for work), but continue to face this irritating problem where Photoshop CS3 screws up the color profile and washes out all the color when saving as a jpeg. I’ve tried one workaround I found googling, but that has not worked. I was able to salvage yesterday’s lamb pictures somewhat, but who wants to look at a picture of a greyish tomato? Newwwpp! So I had to wait until I got home to my personal Windoze machine tonight to redo the pictures and post this. Adobe, I love your products, but you messed up on this one. More net research required methinks.

P.S. I meant to do a shout out to my former work colleague Allison Hemler for kicking off her internship at Serious Eats and getting her first post up. We miss you AH, but good to see you taking on such cool new projects!

Pesto Rack of Lamb; Saturday in the Catskills

pesto lamb (out of oven)

Last night had one of those amethyst skies that, should you see the effect in a Frederick Church painting your brain would rebel against the artist’s dramatic flair. However, there it was in full glory.

It was a glorious day for food as well. In the morning we popped up to Gills Farm and then Fleishers, the grass-fed and organic meat butcher in Kingston, NY. It was pretty cool to watch Josh, the proprietor, break down the lamb in front of us. We had cut a massive amount of basil from the farm, and so Lisl, Aussie that she is, turned to me and said “pesto rack of lamb?” I’ve never splurged on a rack of lamb before, but we decided what the hell. The quality at Fleishers is hard to resist. I’ll post some other pictures from the day below, but first the very simple lamb recipe that Lisl prepared:

Pesto Rack of Lamb

Trim any excess fat from the rack of lamb and smear pesto (see below) all over the meat.
pesto lamb (applying)

Preheat oven to 450F. Place the lamb rack on a baking tray and roast for 10 minutes, then turn down the heat to 400F and roast for another 15 minutes. Remove from the oven (the very top picture) and then slice between the bones to separate each chop.

pesto lamb (plated)

We served this with zucchini and some boiled potatoes lightly tossed in some of the remaining pesto (yes we on a serious pesto kick, but it wasn’t overwhelming). This is paired nicely with a pinot noir.

Pesto (fast/lazy method)
While 101 Cookbooks has a very cool post on making pesto like an Italian grandmother, we were in a hurry so used the food processor. Making pesto is about tasting as you go, rather than scientific measurement. I stuffed several handfuls of basil leaves in the food processor with a handful of pine nuts, several pinches of salt, a clove of garlic, a handful of grated parmesan cheese, and a dousing of olive oil. Then it was just a matter of pulsing and adding more olive oil and increments of cheese/nuts/salt (whatever was needed), and pulsing again, until I was happy with the flavor and texture. Doing everything in the processor isn’t optimal (Jamie Oliver, for example, pulses his basil and pine nuts, but mixes his cheese, salt and olive oil gently in another bowl), but I’ll admit that I was moving fast and didn’t want the extra bowl to wash up!

Other Saturday pictures
Gills tomatoes
Gills Farm still has tons of zucchini and now has sweet orange tomatoes.

Salad
We joined some friends for lunch and had to bring a salad to feed 9. This is just a combination of green and yellow peppers, red and orange tomatoes, radishes, red onion, feta cheese, basil, oregano, salt, pepper, and gently tossed with olive oil and a bit of white wine vinegar.

Fleishers shop
Walking into Fleishers in Kingston, NY

Fleishers lamb
Josh breaking down the lamb that would produce our rack. Moments before we watched him break down a pig. If you go in there, don’t hesitate to talk to him — he is super nice and has a depth of knowledge about his meats as well as how to cook with them.

kingston fire engines
As we were walking back to the car, we came across a street fair organized by the fire department showing off these fabulous old engines from Kingston and surrounding towns. What a treat!

Tomato & Black Eyed Pea Thai-inspired Salad

Tomato & Black-eyed Pea Salad
If you are looking for ways to use your summer tomatoes, and want to try an interesting salad dressing, you might enjoy this combination. I used a Thai-inspired base dressing normally used in Yum Nuea, but then mixed with basil (in Yum Nuea, you add cilantro, ginger and serrano peppers).

The resulting salad was a satisfying meal unto itself (the black-eyed peas were critical to making it hearty), and an interesting new flavor which we enjoyed.

The following amounts served two

Dressing
2 tbsp cup lime juice
1 to 1 1/2 tbsp fish sauce
1/2 tsp sesame oil
Several drops of dark soy sauce

1/2 cup of black eyed peas
2 ripe medium or large tomatoes
Handful of cherry tomatoes
1 red pepper
Red onion
Handful of basil leaves
Several leaves of lemon basil

Cooking the black-eyed peas: I put the black-eyed peas in a bowl to soak in the morning before heading to work, but that is optional. In any case, put the beans in a pot of cold water about 1 inch over the top, bring to a boil, then lower to a gentle simmer and cook until tender (about 25-30 minutes if soaked, and another 15 minutes or so if not). I made a larger batch, but used roughly half a cup in the salad.

In a small bowl, combine the dressing together, finalizing amounts to taste (start with minimal soy sauce and add drops to taste — like you experience with salt, if you go overboard with soy sauce by accident, you are better off starting over than trying to fix).

Cut a few thin slices of red onion, break into smaller pieces, and soak in the bowl with the dressing while you finish the rest of the salad.

Slice your large tomatoes into thin crescents. Halve your cherry tomatoes. Remove the stem, seeds and inside of the red pepper and chop into bite-sized pieces. Do a loose chiffonade of the basil leaves, i.e. cut into very thin strips (note: I didn’t bother rolling up the leaves before cutting, which is a common chiffonade approach).

Combine everything into a bowl, toss, let sit for just a few minutes, toss again and serve. We paired this with a nice rose.

Making great natural yogurt: EasiYo

EasiYo
I never liked natural yogurt until my wife Lisl took me to Greece one summer, and all of a sudden my definition of yogurt changed completely. At that point I understood why all the Aussies and Europeans complained vociferously about American yogurt.

The only comparable yogurt that we could find back here in New York was Total, but it was expensive. Then Lisl’s mother came visiting from Sydney one year and introduced us to a home yogurt system from New Zealand called EasiYo. It is finally available in America and I can’t recommend it highly enough. It is really easy, delicious and cost-effective. The international website is here, and their North American distributor (“Phase One Trading Group”) is located here. (We usually get the Greek and reduced fat yogurt bases.)

P.S. we have no business connection to this brand whatsoever — we just love the product.

Recipe Links 8-21-08

We started this blog a couple of months ago originally as personal space to store, tag, and share recipes with friends. It is one reason why we have no official first post, just entries like “Grandma’s Oyster Stew” and “Mom’s Meatloaf” where I ported recipes over from my old personal website. Every week since then, I continue to discover new foodie blogs that inspire me, or resources like Rancho Gordo mentioned below. There’s no question that I’ve become a better cook by engaging in the foodiesphere.

And I’ve said it before, but boy-oh-boy does the foodiesphere have a huge sweet tooth!

I love the new discoveries. One unexpected example is the delicious restaurant Lisl and I went to last night, which I never would have pulled from the Manhattan haystack save for a recommendation from Stacey over at Stacey Snacks, who I met through Foodbuzz.

In no particular order, here are a number of blog recipes from the last couple of weeks that I want to try later when inclination strikes. This isn’t meant to be any kind of “best” list or any of that nonsense – just things that caught my eye that I will forget if I don’t write down.