Chickpea Stew with Coconut Milk

chickpea kale stew

For Sunday’s dinner, I wanted to go vegetarian and hearty. This combination of chickpeas, potatoes, cauliflower, kale, and coconut milk really hit the spot. This was a real stick-to-the-ribs meal for a chilly fall evening.

Served 4

1/2 lb dried chickpeas
1 green pepper, de-seeded, de-stemmed and quartered
3 cloves of garlic, peeled

1 onion (spanish or vidalia), chopped
1/2 head of cauliflower, chopped into 1/4 to 1/2 inch pieces
2 medium red potatoes, chopped into 1/4 to 1/2 inch pieces
6 or 7 stalks of fresh kale, loosely chopped
14 oz coconut milk
1 to 1 1/2 cups of chickpea cooking broth or vegetable broth
1 tbsp tomato paste
10 sprigs of fresh thyme
1 tbsp ground cumin
1 tsp of salt, then to taste
ground pepper
hot red pepper flakes

After washing your dried chickpeas and checking for small pebbles, place in a medium sauce pan and fill with water 1 1/2 inches above the top of the chickpeas. Add in the green pepper and garlic, and bring to a boil. Simmer for several hours until tender, then save two cups of the cooking liquid, drain the rest and discard the pepper and garlic. (Note: you can soak the chickpeas overnight to speed this up, or just use canned, but make sure you thoroughly wash the chickpeas if you use canned)

Preheat oven to 350F.

In a large oven-proof pot, saute the onion on medium heat, then add the potatoes. Let this cook for several minutes, then add the cauliflower and the sprigs of thyme. Cook for a few more minutes, and then add the kale, coconut milk (make sure it is well stirred/shaken), the tomato paste, ground cumin, and 1 tsp of salt. We used about 1 1/2 cups of broth, but if you are using canned chickpeas or less potato, you might want to start with 1 cup and add as needed. Cover and place in the oven for an hour or so, checking periodically to give it a light stir. If it looks too dry, add a little more broth. Grind in a little fresh pepper and check for salt before serving. Finally, add some heat by sprinkling red hot pepper flakes on top when you serve.

Notes: if everyone likes heat, I definitely would stew it with jalapenos as well. I am thinking this might be good with some smoked paprika but have not tried that yet.

Meatloaf Meets Thanksgiving Stuffing

I love my mother’s meatloaf recipe. Maybe that is not unusual, but I always find myself satisfied when I make it, and I am invariably disappointed when I try meatloaf in restaurants. The recipe for the original recipe is posted here, and I hope you try it.

Tonight however, as a prelude to the looming Turkey Day here in the US, I changed things up a bit and brought hints of Thanksgiving “stuffing” into my meatloaf. The reaction was gratifyingly positive, so I deemed it blog-worthy. Apologies for the less-than-great photo above, but it gives you a sense of texture.

(Note: what kind of stuffing do I love? It comes from a 1973 NYTimes recipe for Thanksgiving turkey that my mother cut out and we have been making ever since, because it is just that good!)

Meatloaf
1 lb ground beef
1 lb ground pork
1 large onion (spanish), finely chopped
8 white button mushrooms, finely chopped
3 stalks of celery, finely chopped
10 large black olives, chopped
1/3 cup walnuts, chopped
1 tbsp fresh sage, finely chopped (if you love sage, add more)
1 cup finely chopped parsley
1 tbsp worcestershire sauce
2 tbsp ketchup or tomato paste
1/2 tsp salt
1 egg
bacon

Pre-heat oven to 425F.

Heat up a splash of olive oil in a saute pan, and saute the onions until transparent. Add the mushrooms and cook for several minutes, and then add the celery. Cook for another 5 to 10 minutes, then turn off the heat and let cool.

In a large bowl, combine everything but the bacon. (note: I mix it all up with my hands, well-washed before and after)

In a large baking dish, shape your meatloaf. I usually mold it into a roughly-rectangular shape about 1.5 to 2 inches high and 4 or 5 inches wide. Then drape slices of bacon across the top.

meatloaf prep

Place in the oven, and after 10 minutes, turn the heat down to 350F. Cook for another 50 to 60 minutes — if the meatloaf is firm, it should be done.

We served this with a potato, brussel sprout and celeriac gratin (in milk) — good, but I want to continue to tinker with that recipe and improve it before blogging.

potato gratin

Stewed Meatballs with Arugula

stewed meatballs

What’s not to love about meatballs stewed in tomato sauce? It’s a timeless combination, no? I love to cook variations of a recipe I originally picked up from Jamie Oliver (I’m a big fan of his cookbooks). My original adaptation of the recipe is posted here. The other day, I remade it with some changes to the meatballs — there are so many directions you can go and still have it be delicious, as long as you don’t use spices that will conflict with your tomato sauce. The other major difference was the use of a big bunch of arugula instead of basil to add more body (I’m guessing that kale would be good as well).

For this variation, I created a simple tomato sauce that combined 20 oz of peeled san marzano tomatoes with some sauted onions and garlic, ground savory, dried oregano, a splash of red wine vinegar, and seasoned with salt and pepper.

Meatballs
1+ lb of ground beef
2 slices of italian / farm bread, pulsed into breadcrumbs
1/2 cup of finely chopped parsely
1 tbsp dried mexican oregano
pinch of hot red pepper flakes
healthy pinch of salt
1 egg

Combine everything and mold the mixture into meatballs. I made 9, each about an inch and a half in diameter. Then brown them in an oven-proof pan and then turn off the heat when browning is complete.

meatballs formed

Once the meatballs are ready to go and the tomato sauce meets your approval, turn off the heat to the tomato sauce and stir in a large bunch of torn arugula leaves (my guess is about 5 oz worth – considerably more than the amount of basil that went into the original recipe).

Pour the tomato sauce over the meatballs and add some chunks of mozarella cheese.

meatballs final prep

Place in an oven preheated to 400F and cook for 20 minutes.

Fennel Gratin, Roast Chicken, and a night to remember

At 11pm, I felt relief. A few minutes later, I felt admiration for McCain showing his true colors by conceding with dignity. Then Barack stepped up and said what we all knew was true: tonight we have only opened the door — now the hard work truly begins. We shall see what kind of President Barack Obama really becomes, but I am glad this country chose hope and change. Americans believe that our country is a beacon, and it is time we earned that belief once more. This country has a lot to do and fix, but tonight, I am happy.

But wait, food what when how?

Tonight we made two dishes: a roasted chicken stuffed with olives and potatoes from Stacey at Stacey Snacks, and a fennel gratin from an Alice Waters recipe. Both were absolutely delicious.

Fennel Gratin, slightly adapted from Alice Waters’ The Art of Simple Food

2 large fennel bulbs
2 tbsp butter
1 1/2 tbsp flour
1/2 cup milk
1/3 cup fennel cooking liquid
Salt
pinch of ground nutmeg
pinch of hot hungarian paprika
pinch of hot red pepper flakes
1/2 cup grated parmesan cheese
1 tbsp of minced fennel frond

Cut the fennel bulbs in half and then into wedges. Mince up a small amount of the fennel fronds and set aside. Boil the wedges in salted water for 5 minutes. Remove the fennel with a slotted spoon and set aside. Reserve 1/3 cup of the cooking liquid.

Next, make a white sauce by melting the butter on medium heat, adding the flour, and cooking for a couple minutes, whisking constantly. Then slowly add the milk and fennel cooking liquid in small amounts, whisking as you go. Once the liquid is mixed in, lower the heat to a very soft simmer and cook for another 15 minutes. Turn off the heat and stir in a couple of pinches of salt, and the nutmeg, paprika, pepper flakes, and parmesan (note: Waters uses cayenne pepper instead of the hot paprika and pepper flakes).

Butter a baking dish and spread out the fennel wedges, and spoon the sauce on top. Bake in an oven set at 375F or 400F for 30 minutes or so (note: Waters calls for 375F, but we had the oven set to 400F since we were also finishing the chicken roast). When the tops are browned, remove, sprinkle with a little salt, pepper and the fennel fronds, and serve.

Comment: I found that the amounts for the white sauce led to a thick sauce that did not cover all of the fennel, but that actually ended up being a good thing, keeping the dish from being too rich and allowing you as the eater to choose what kind of mouthful you wanted.

chicken roast

The other part of the meal was a roast chicken with potatoes, olives, capers, rosemary and other good stuff. We spotted this recipe on Stacey Snacks (link), and Lisl prepped and cooked the dish. It was marvelous. Follow that link to the recipe, and listen when Stacey says to make sure that the potatoes are cooked before you put it all in the oven, because the potatoes stuffed inside the chicken will not cook all that much, even in the oven for 1 hr 15 minutes at 400F.

Happy election day.

Beef Pot Roast in Beer

braised beef sliced

Yesterday I decided to do another braise, and since so many of my creations lately have been tomato-based, I decided to riff off of the spice rub from a recent recipe from Sass & Veracity, her Beef Chuck with Vegetables in Red Wine. I used a dark beer and had a few other alterations, but the direction definitely came from Kelly.

But first I wanted to touch on an interesting discussion that Kelly kicked off a few days later that was focused on food photography/blogging and revolving around “food photo snobbery”. You should read her blog and the comments it elicited, but to pull a few lines, Kelly wrote: “The problems begin when a judgment is made about the quality of the dish by looking at the photo alone. If this is all about photos, then why post a recipe.” She also noted to me “If one is taking the time to think about content and “readers” are only scanning the pretty photos, then blogging becomes as impersonal as a pretty cookbook can be.

I can’t resist going big picture for a second. This notion of quality is a recurring one in this era of online creation. When blogging first gained traction, there were (and are) debates over writing quality. YouTube, Flickr, and Second Life — wherever there is “user generated content” — all spur discussions of good versus ugly.

I love this video by Ze Frank (Internet artist/philosopher for lack of a better description), where he’s riffing on “ugly” MySpace pages, and how the lowered cost of creation tools is opening up design to everyone, which is a very cool thing. (Ze is a trip of non-stop ideas — I once shared a taxi with him on the way to a conference and thought my head would explode, but in a good way).

When it comes to food blogs, I appreciate authors who put effort into their pictures (and I count Kelly as one of those). Food photography is damned hard. I’m fighting with it constantly, especially since I do not use fancy equipment of any kind. I like a blog post that shares not just via words and measurements, but through images as well. I’ve probably driven half of you away by this point with all this text and just one picture so far! But I sally on! My personal preference leans towards more natural photos, just as my food preferences lean towards “peasant food” rather than foams and haute cuisine.

Photography is an art form, and as such quality is a subjective thing. Everyone should have confidence in their own subjective tastes, and ignore self-appointed critics. Look to improve, but not to be something you are not! Robert Henri, an influential early-20th-century American painter (he led the Ash Can School / Group of 8), nailed it when he said of art: “The man who has honesty, integrity, the love of inquiry, the desire to see beyond, is ready to appreciate good art. He needs no one to give him an art education; he is already qualified.” (I should note that the Group of 8 got hammered by the art establishment of the time, so it’s no surprise that Henri was saying “stuff your pedigree!”)

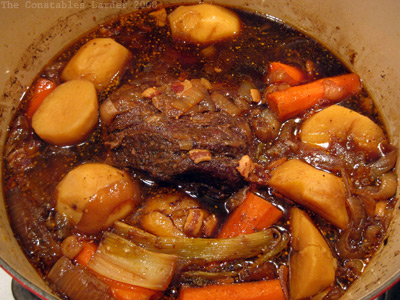
Now, speaking of un-fancy photos, on to the pot roast, I mean braise, I mean whatever the heck it is! This one spent part of the time in the oven, and then was booted to the top of the stove to make room for Lisl’s loaf of bread. If it is both a braise and a pot roast, that make it a broast?

And for the record, I find that it is very hard to take pretty photos of braises once plated. I tried for this meal and they were so damn boring, I left them off.

Beef Pot Roast in Beer

2 lb beef chuck roast
2 tsp coarse sea salt
2 tsp peppercorns
1 tsp mustard seed
1 tsp sweet paprika
1 tsp smoked paprika
1 tsp dried oregano
1 tsp brown sugar
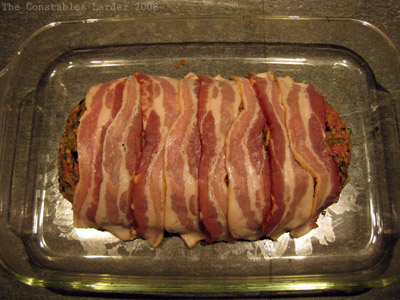
6 slices smoked bacon, sliced into 1/2 inch pieces
base of a bunch of celery stalks
1 dark beer (I used a stout)
1 cup of water
2 large onions, loosely chopped
2 bay leaves
4 cloves of garlic, peeled
4 large carrots, peeled
Handful of medium red potatoes, peeled

Preheat oven to 350F. In a mortar, grind up your mustard seeds and black pepper, then mix in the other spices (salt, paprika, oregano, brown sugar). Rub the mix all over your roast.
braised beef rub

In a dutch oven on the stove top, cook the bacon until almost crispy, then remove. Sear the roast on both sides and remove, and deglaze the pot with the beer and water.

Add the roast back in, and sprinkle the bacon and onions around. I also chopped the “foot” off of some stalks of celery to add flavor, and tossed in an extra celery stalk, 4 cloves of garlic, and a couple bay leaves.
braised beef start

Let this cook for 20-30 minutes at 350F, then lower to 290F. At the hour mark, flip the roast. Let this cook for another 2 to 3 hours, flipping the roast once more, then basting it every 40 to 60 minutes or so. Keep an eye that the liquid doesn’t get too low, and add some stock or water if it does (with the heat set this low, I did not have to add more). Add the carrots and potatoes with about 1 1/2 hours left and turn them about halfway through.

braised beef done

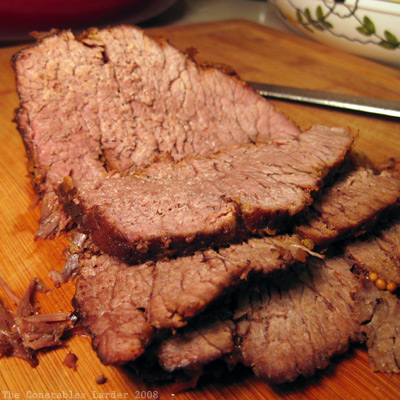
As noted, my pot was booted from the oven but I kept it warm at the lowest setting on our gas stovetop. I removed the roast, carved it across the grain (top picture), and served on a bed of egg noodles with the potatoes and carrots, generously spooning the fabulous liquid from the pot on top.

Roasted Pumpkin Seeds

pumpkin seeds

I love roasted pumpkin seeds and for some reason this is always the only day of the year I do it. Today, as an experiment, I tried the method from Simply Recipes where you boil the seeds in highly-salted water first, and then roast at 400F. This provides a “more balanced salt distribution,” as Heidi put it.

The result was good, I will say that. I split my seeds into three batches, one which was roasted with no additional spices, one which was dusted with a mix of ground coriander seeds, ground cumin seeds, and ground cayenne pepper, and one that was dusted with curry powder.

However, I learned that I don’t want more balanced salt distribution! I not only love the look of the salt crystals on the roasted seeds, I love the haphazard explosion of salt you get when you pop one (or 10) in your mouth. So in future I am going back to my usual method of cleaning the seeds, seasoning them, and roasting them at 375F in a touch of olive oil.

Happy Halloween ya’ll. I hope you had a fun one. Below are the two victims who gave up their seeds for our enjoyment. I love the little guy on the left — he was modeled after a pumpkin drawing that munchkin gave to me.

pumkins