Dry Rub Pork #2, Stuffed Tomatoes with Black-eyed Peas

dry rub pork and stuffed tomatoes
Well this was — hold on, I need to pour another glass of wine — an interesting night but the results were actually delicious (yes, miracles happen). You are going to say, you did WHAT with your oven in July heat? Well, let’s start with confessions. I left the grill on last night and so ran out of propane —

hey wait a sec, it was a long day of work and I was tired!
yeah?
well, that’s what my wife said too.

Anyway, the salient point is that outdoor cooking was out. I got home from work and the first question as I fed the munchkin was (well, the first question after, no you can’t “eat that plum / watch tigger and poo / pick mummy up from the train” … before eating your dinner) … ahem, was “what has to be used?” Answer: pork loin, the black-eyed peas I didn’t use for the salad the other day, and a couple of fat tomatoes.
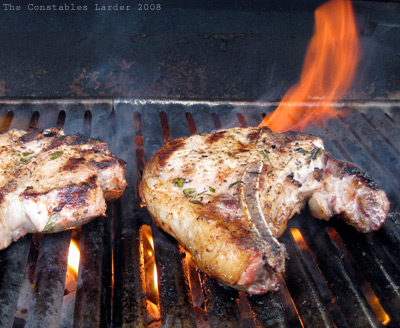
DRY RUB PORK
I’ve fallen in love with dry rubs. Tonight’s combination came out really nicely (query: do they all?):

1 tsp salt
1 tsp brown sugar
1/2 tsp coriander seeds
1/2 tsp whole black peppercorns
1/2 tsp cumin seeds
1/2 tsp mustard seeds
1/2 tsp smoked paprika

I ground up everything but the salt and brown sugar in a spice grinder (okay it was Lisl’s coffee grinder but we won’t go there, will we? no, I didn’t think so). I had just over a pound of “family style” pork loin and so rubbed the spice mixture over it and let sit for about 20-30 minutes.

Since my grill was not an option, I broiled the pork on both sides in the oven for 2 minutes each side on a high rack (and sitting on a broiling pan), and then dropped it down to the middle of the oven and baked it at 300F for about 1.5 to 2 hours. Halfway through I pulled it out of the oven and dribbled olive oil and some apple cider vinegar on the top. Result? Killer. The outside crust was crunchy and the lower-heat cooking kept the inside moist. I should note that the pork loin was still in one piece, not sliced into “boneless ribs” as some butchers are doing these days — if you have smaller pieces you’ll have to reduce cooking time to keep the pork from drying out.

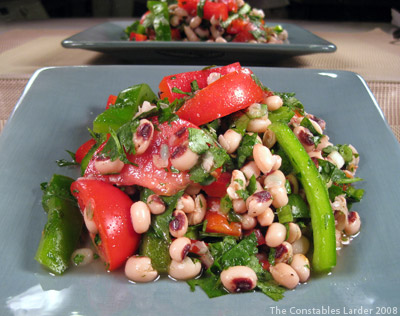
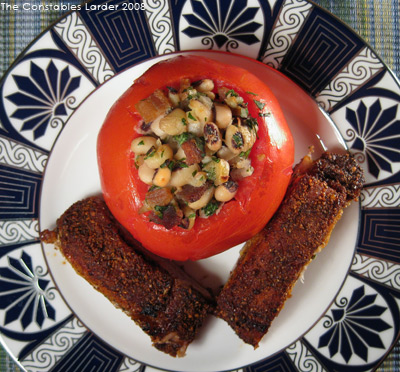
STUFFED TOMATOES WITH BLACK-EYED PEAS

2 large tomatoes
1.5 cups cooked black-eyed peas
1 handful of Italian parsley
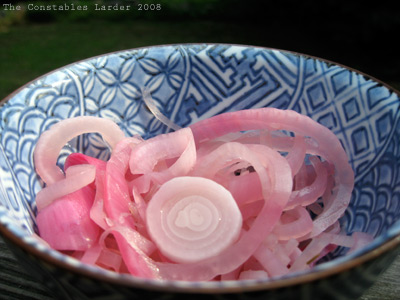
1 large shallot
Red wine vinegar
olive oil
salt & pepper

In my case, I already had some leftover black-eyed peas, but if you are starting from scratch: soak 1/4 lb of black eyed peas for several hours, then drain, cover with fresh water, bring to a boil, then simmer loosely covered for 30 minutes (note: if you don’t have time to soak, no worries, just cook until tender, probably another 20 to 30 min).

Mince up a shallot and lightly saute it in some olive oil (note: if you want to save the extra cleanup, skip the sauteing and just mix them in raw).

Chop up a large handful of Italian (flat leaf) parsley.

Combine the peas, shallots, and parsley in a bowl. Add a pinch of salt and ground pepper, a teaspoon of red wine vinegar, and a tsp of virgin olive oil. Add more vinegar to taste. Keep on mixing and adding salt until you are just a hair past how much salt you would normally have in the dish.

Take your tomatoes and carve off the tops of both (just like taking off the top of a pumpkin). Carefully take a small spoon and scoop out the flesh and seeds in the middle of the tomato, and let any liquid run out.

Get the oven up to 450F. Stuff the tomatoes with the mixture, place in a small baking dish, dribble some olive oil on the top and around the sides of the tomatoes, and place in the oven for 20 minutes. It should all melt together nicely when you cut into it.

Final Notes:
Another confession (there’s been a lot of that in this post it seems): you’ll see in the picture at the top something in the stuffed tomato that looks suspiciously like bacon. That’s because it is bacon. I had a misguided notion, but I can say that both Lisl and I had enough forkfuls missing the bacon that we were convinced it was much better without. Which is why I have the gall to put the vegetarian tag on this post, since my vegetarian friends can make the stuffed tomato dish. We’ll just pretend the bacon never happened. Photoshop, anyone?

Bittman, back to basics

A colleague of mine recently pointed me to Mark Bittman’s speech at the TED conference, which definitely shares an interesting perspective on trends in American eating and the impact of the livestock industry on the environment.

He also was kind enough to send me two Bittman cookbooks, including How to Cook Everything. I really like what I have read so far — it is unpretentious and back-to-basics. I don’t think that anybody, in any profession, is ever so far advanced that they cannot benefit from a return to the basics, let alone someone like me who still a relative beginner in this realm. Bittman, for example, has a whole section on beans — not just bean recipes, but an explanation of different kinds, dried versus canned, and the theory behind different approaches to cooking beans. That kind of information is surprisingly hard to find.

One can copy a complex Boulud recipe and certainly learn a lot by doing so, but to truly treat food like an art medium (which is why I love it), you need to understand the root theory and the building blocks. Painting is no different — prior to the 20th century’s foray into abstraction, artists were trained by drawing simple building blocks. Cezanne once wrote, “treat nature by means of the cylinder, the sphere, the cone, everything brought into proper perspective so that each side of an object or a plane is directed towards a central point. Lines parallel to the horizon give breadth … lines perpendicular to this horizon give depth.

Still, there are basics and then there is the scientific foundation (how far people go usually depends on their artistic versus engineering bent). You don’t need to know what a monosaccharide is to cook, but there is an interesting blend of chef/chemist/innovator emerging these days (or maybe it’s always been here and I’m just clueing in now). Ideas in Food is an interesting blog that balances exploration without the reader needing a chemistry PhD.

Speaking of basics, I haven’t been writing here about the very simple dishes I do (last night’s speed meal was grilled lamb with a fennel seed, lemon & yogurt dressing, and steamed broccoli) because I figure they are boring. Still, in food as in life, the basics are important and I look forward to doing some more hands-on exploration of Bittman’s cookbooks.

P.S. I have no segue into this, but check out this very funny New Yorker bit on Fourteen Passive-Aggressive Appetizers

Preserving Roma Tomatoes: redux

A few weeks ago, I posted about making a simple pasta sauce that stunned me with its flavor because we were using these incredibly sweet preserved tomatoes given to us by a good friend who lives in Harrison, NY. I asked her to fill me in on the process they went through, and she was kind enough to oblige with the below description. This summer Lisl is hoping to join them as they undertake the process once again, so hopefully we’ll get some good pictures:

“It was a hot and steamy August day when we assembled in my mother-in-law’s garage to make the sauce (or gravy, as it is referred to in these parts). By the time I arrived the garage was already set up with an industrial size pot on a burner placed in the center of the space and a couple of restaurant size pots on a stove top. On one side of the garage was a tressel table with well over 100 empty jars, small and large, awaiting the finished product.

Angela had purchased 4 bushels of Roma tomatoes from a New Jersey farmer. Each one had to be cut into quarters and the seeds and juice squeezed lightly out and then tossed into the big pot. I worked with my mother-in-law, sister-in-law and twelve-year old niece for hours quartering tomatoes and tossing them into the gently boiling pot, stirring occasionally. As the pot filled up, we began with the two back-up pots.

Some time after we finished quartering the tomatoes, Angela set up the machine for removing the skins and any pulp or seeds. The machine reminded me a lot in appearance of an old meat grinder my grandmother had used when I was a child. The sauce that came out was of a fairly thin sauce consistency, but the by-product – the skin and pulp that had been removed – was very thick, rather like tomato paste. Angela explained that we had probably not been quite diligent enough in squeezing out the tomatoes in the first place ( I was probably guilty here – as a novice it pained me to see all what I saw as ‘good stuff’ going to waste), but that this was just a base sauce that could be used in preparing a wide range of dishes.

The sauce was put back on the burner for a while, and a little salt added, if I recall correctly. A couple of basil leaves were placed inside each waiting jar, then finally the boiling sauce was poured with great care into each. The jars we sealed with the two-piece preserving lids – the top placed on then screwed down as tightly as possible (with great care to avoid burning), to be followed by a little pop as the suction sealed the jar tight. “

Black-Eyed Peas, Cilantro Salad

Black Eyed Pea salad
While I will probably always remain an omnivore, I’ve been trying to eat more vegetarian meals. Tonight we went with a black-eyed peas & cilantro/lime salad, roughly inspired by a Saveur recipe, that came out really nicely.

For 2 full servings
1/4 lb. dried black eyed peas
1/2 yellow onion
1 green pepper
1 red pepper
fresh cilantro (coriander)
fresh flat-leaf parsley
2 medium tomatoes
3 spring onions (scallions)
1 jalapeno, or some pickled jalapeno slices
3 limes
extra virgin olive oil
salt & pepper

Soak your black-eyed peas overnight or for several hours during the day. Cover with water in a pot with half a yellow onion and bring to a boil. Lower heat and cover, letting simmer for about 30-35 minutes or until tender. When done, remove onion, drain in a colander and cool by running cold water over the peas. When fully drained, add to salad bowl.

Remove seeds from your green and red peppers and chop to desired style (I chopped them up about 1.5 to 2 inches long, 1/3 inch wide), then add to bowl.

Take a very large handful of fresh cilantro and loosely chop, removing any excess stalk, then add to bowl. Take a handful of flat leaf parsley (discard the stalks) and more finely chop, and add to bowl.

Cut 2 medium tomatoes into eighths, and add to bowl. De-seed a hot jalapeno pepper, then chop and add. If you don’t have access to fresh jalapenos, a handful of pickled jalapenos loosely chopped will still work well.

Thinly slice 3 spring onions (scallions) starting in the white and cutting as high into the green as you can (where the green is still fresh), and add. (Optional: slice up and add some red onion)

Squeeze the juice from 3 fresh limes over everything. Add 4 tbsp of extra virgin olive oil (that is a guess — it could have been more since I never really measure my olive oil amounts; really you should do it to your own taste).

Mix up your salad, but try to be gentle so that you don’t mush up your peas. Let it sit for 15-20 minutes so that the peas start to take on the flavor of the lime and olive oil.

Add salt and freshly ground pepper to taste. I found that I used more salt than I normally use in a greens-based salad, so add salt carefully as usual, but be prepared to taste and add more.

We served this with Presidente beers (a Pilsner-style beer from the Dominican Republic). While I didn’t think of it at the time, some lightly toasted pita bread would also make a nice accompaniment.

P.S. this keeps overnight in the fridge really well (possibly even better) since it all marinates together.

On Joining the Foodiesphere; Recipe Links

I’ve been actively involved in the social media / virtual worlds blogosphere for a number of years for work, but am a total noobie to the foodiesphere. I have to say that it has been a joy to explore and join. There are some wonderful people out there, not just in terms of the quality of their food, photographs and culinary ideas, but also in terms of friendly, community spirit.

I’ve also noticed that there’s a lot of folks in the foodiesphere who are really into baking, and even more into desserts (which I almost never make, but they do make for awfully nice food photos).

Part of my exploration consists of working my way through various blogrolls, and accordingly a whole new “food” category has been growing in my RSS reader. I have also enjoyed discovering foodbuzz.com, and have slowly been getting the hang of it. My interactions with the FoodBuzz staff have been very positive — they seem to truly care about building the community, which strengthened my desire to participate more actively.

As I run into great recipes from other foodies, I am going to save links here so that I can find and try them in future:

Eggplant Parmesan, and risking the ire of M. Hazan

Marcella Hazan wrote on eggplant parmesan, “Perhaps some cooks find it too commonplace to attract their attention, but at home I have never stopped making it.” Hear Hear!

I knew that there would be no time last night to make dinner, so the day before I prepped this simple dish with these lovely baby eggplants.
Eggplants
With large eggplants, you normally lop off the green top, then slice the eggplant lengthwise about 3/8 inches thick. Goddess Hazan (G.H. for short) recommends peeling them first, and also seeping the eggplant for 30 minutes with a sprinkling of salt (standing them up in a colander), then patting them dry. For her eggplant parm, G.H. handles her components separately. She coats the eggplant slices in flour and then fries the slices in 1 1/2 inches of olive oil. She cooks her tomatoes separately, and just does multiple layers of eggplant, tomato, cheese, basil, until the last layer of eggplant upon which she finally puts a layer of cheese and pops in the oven at 400F for 35 minutes.

Don’t tell G.H., but I cheated and skipped all of that. I just took off the tops of the baby eggplants and placed in the baking dish whole and uncooked (they ended up looking like little squids, so perhaps if you are trying to feed this to an imaginative 10 yr old, you might cut them in half). I made a tomato and basil sauce rather than layering individually.

My independent streak might not serve me well with G.H., but perhaps she’ll bless me for using tinned plum tomatoes. But wait, on tomatoes, GH also says, “When buying canned tomatoes, if one has a choice one should look for whole, peeled plum tomatoes of the San Marzano variety imported from Italy. They are the best kind to use and, if possible, settle for no other.” Oh dear. I DON’T REMEMBER. I mean, I THINK they were Italian but San Marzano? and what if something else was on sale? Noooooooooooo!

Moving on before I get struck by lightning: I whipped together a very simple sauce. I chopped up a medium yellow onion and sauted it in a saucepan with a dash of olive oil until translucent, then added two whole tins of skinned plum tomatoes, a couple tablespoons of olive oil, about a tablespoon of salt, a teaspoon of cayenne pepper, a few grindings of fresh pepper, and two large handfuls of basil, loosely chopped. I brought this to a boil then let simmer for about an hour, stirring gently so as not to break open the tomatoes until the very end when I turned off the heat and chopped up the tomatoes using my wooden spoon (they are so fragile at this point they break up pretty easily).
eggplant-parm-sauce

Tomato Sauce
2 tins whole, skinned, plum tomatoes
1 yellow onion
1 tbsp salt (but really do this to taste)
1 tsp cayenne pepper (or chili powder)
2 large handfuls of fresh basil, chopped
ground pepper
olive oil

I placed the eggplant in a baking dish and spooned half of the sauce around them. Then I scattered a generous layer of grated parmesan cheese and grated mozzarella cheese. As you’ll see in the below picture, I ended up getting impatient with grating and just layered a few more slices of mozzarella.
eggplant-parm-layer

The final step was to put a layer of the rest of the tomato sauce on the top and pop into the oven for an hour at 350F. I let it cool, popped it into fridge, and reheated the next night for a quick, painless, and delicious meal. Commonplace and basic? No doubt. Satisfying? Unquestionably.

Pickled Red Onions (improvised)

pickled red onions
Flipping through a back issue of Bon Appetit (July 2003), I came upon a recipe for “pink pickled onions” that I just had to try. The magazine called for pickling spices and fresh rosemary, neither of which I had at hand, so I improvised the following adaptation working within the limits of my spice cabinet that day, sticking with spices that could be strained out (i.e. not ground).

1 red onion, sliced thin into rings
1 cup white wine vinegar
3/4 cup water
1/2 cup sugar
1 tbsp dried rosemary
1 tbsp salt
1 cinnamon stick
1 tsp cloves
1 tsp cumin seeds
1 tsp whole black peppercorns
2 dried bay leaves

In a medium saucepan, add the vinegar, water, sugar and all the sprices and bring to a boil, stirring until the sugar and salt dissolve. Reduce heat and simmer, covered, for about 10 to 15 minutes. Place a metal bowl underneath a fine strainer and pour the liquid through the strainer so that the spices are removed. Push the sliced red onions into the liquid in the bowl and let cool.

I had hungry hordes to feed (ok, only my wife and daughter but when they are peckish, even Genghis would run for cover), so I let sit for just under an hour while I prepped the rest of dinner. You can also cover and place in your fridge for longer.

P.S. dinner consisted of sandwiches made out of grilled, spicy (chorizo-based) sausages (sliced) which could be swapped out for vegetarian sausages (in that case, I would recommend adding a little kick like Thai chili sauce), the pickled onions, chopped romaine lettuce and natural greek yogurt as a condiment. I wished I had some Cuban black beans to serve with it.

Trice the Fool (Gooseberry, Blackberry and Ginger Snap Fool)

gooseberries.jpg
Walking through the Kingston farmers’ market, we came across a stand with pink and green gooseberries, which I had never tried before. The stand-keeper (for lack of a better name) was kind enough to let me taste them. Both were delicious but the pink were a nice blend of sweet and tart so I bought a punnet and then went rummaging around for a way to use them. Lo and behold we discovered the “gooseberry fool”, which was a marvelous sounding dessert as long as our 3-year-old did not take to heart the expression “fool on me? no, fool on you!

I ended up referencing two sources (this vegan recipe I found through FoodBuzz, and this recipe I found on Epicurious), but not exactly following either. The results were great, however.

Recipe (enough for 4 servings):
1 punnet of pink gooseberries
1/2 punnet of blackberries
2/3 cup of heavy cream
3 big tablespoons of creme fraiche
1/4 cup granulated sugar
1/4 cup superfine granulated sugar
ginger snap cookies
fresh mint leaves
2 tbsp unsalted butter

1. Remove the tops and tails of the gooseberries (you can see them in the top photo) using scissors or pinching with your fingernails. Then cut the berries in half. In a medium saucepan, cook the gooseberries and blackberries over medium-low heat with 1/4 cup of sugar, stirring constantly and then mashing up the berries thoroughly with a fork once they began to soften. Cook this puree for about 7 or 8 minutes, then remove from heat to cool in a small bowl, then cover and place in the fridge to chill.

2. In a large bowl, whip the heavy cream and creme fraiche until slightly stiff, then add the 1/4 cup superfine sugar and continue whipping until the mixture can hold stiff peaks (I used an electric beater to speed things up). Then fold in the berry puree.

3. Take a large handful of ginger snaps and pulse them in a food processor until you have smallish crumbs. Melt the 2 tbsp of butter and combine butter and crumbs in a bowl and stir around until well mixed together.

4. Take a big handful of mint leaves and loosely chop them up.

5. In your serving glass (or bowl), put down a layer of the “fool” (cream and berry mixture). Loosely scatter a thin layer of of chopped mint leaves. Then add a layer of the ginger snap crumbs. Repeat once more and garnish with some mint leaves.

Gooseberry Fool
The picture above shows a version without the layers of chopped mint leaves, since I tried it this way first and took the picture. I quickly decided that it needed more of a mint kick and the results proved out that theory. The blackberries brought out the incredible pink color.

P.S. I also just found an interesting version at Delia Online with natural yogurt that sounds delicious (hat tip to Foodycat for link to Delia).

Weekend in the Caskills (Caprese, Grilled Pork, Produce)

The local produce has emerged in New York’s Catskills mountains. This weekend we hit our favorite farm stand and popped up to Kingston to visit the farmers’ market and a favorite butcher. For any New Yorkers reading, I should note that Kingston’s market is useful for a few interesting items like zucchini blossoms, gooseberries, and fresh mozzarella, but for your typical farm produce, it is expensive and sadly of mixed quality (that’s not to say there isn’t good stuff to be found, just be choosy). For wonderfully fresh produce, we go to a farm stand located at the back of Gill’s Farm in Hurley NY, right off their fields.
Gills Farm Stand
We walked away with a ton of veggies and an enormous armful of fresh basil for making pesto, some of which Lisl used Saturday night to make her fried zucchini blossoms (the subject of another blog post).
Summer Veggies
Summer Fruit

Hot, humid weather inspires a simple, cool lunch — in this case, a Caprese salad, with slices of tomato, fresh basil, mozzarella, and drizzlings of olive oil, balsamic vinegar and salt and pepper.
Caprese Salad

While we were in Kingston, we stopped by our favorite butcher shop, Fleishers, which not only has the most amazing grass-fed and organic meats, it is also run by the nicest couple (and I just learned they hit the Saveur “Top 100” list for 2008). I purchased two porterhouse pork chops and let them spend the day marinating in the fridge covered in olive oil, white wine vinegar, white wine, grain mustard, and a scattering of fresh oregano, salt and pepper.

Grilling Pork
I grilled them that evening to excellent effect, and while I’d like to give my marinade and grilling skills much of the credit, I think it really belongs to the Berkshire (aka Kurobuta) pork that Fleishers carries.

Wax Beans

The full dinner menu ended up being fried zucchini blossoms to start, then a main course of grilled pork, corn on the cobb (nothing like freshly picked corn), and wax beans (boiled for three minutes then tossed with some butter, fresh oregano, and salt/pepper). We served it with a chilled Malbec Rose from Crios, which I highly recommend.

Yogurt-based Dressing

Yogurt-based dressing
Something about tonight’s heat and humidity made me crave cool flavors. The meal I whipped up was pretty simple: a London broil marinated in sesame oil and soy sauce, then grilled, and a salad of Romaine lettuce, cucumber (cut into strips), ripe tomatoes, and peelings of Manchego cheese with a yogurt-based dressing (with a nice Rose wine).

Lisl has a contraption she brought over from Australia that allows you to make natural yogurt at home (it is so much better than most yogurt available in the supermarket). I started scooping small portions of yogurt into a bowl and tasting different flavor combinations. Among the experiments, the uses of salt or soy sauce were total dead ends. I liked the base mixture of yogurt and Sriracha chili sauce (need only a touch), but in the end my favorite was a more Greek-style dressing:

I mixed two tablespoons of natural yogurt, 3 pinches or so of season salt, several pinches of dried oregano, a touch of olive oil (measurement-wise I would guess about a half a tsp) and some ground pepper. I wished I had a lemon handy because I think some lemon juice would have been a great addition.