Smoked Beef Braise

smoked-braise-pot

Yesterday for a dinner party I decided to add a new flavor to a beef braise: smoke. The results were quite a hit when combined with the braising sauce.

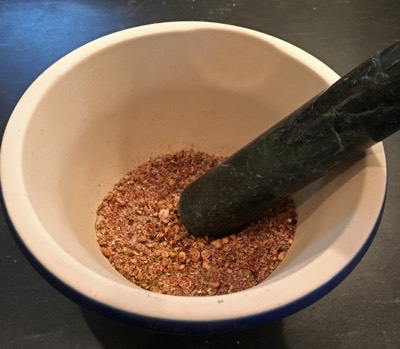
The cut was a 4 pound boneless chuck. I gave it a dry rub of:

3/4 tsp black peppercorns
1 tbsp coriander seed
1 tbsp ground paprika
1/5 tbsp kosher salt
1/2 tsp dried oregano

The peppercorns and coriander seed were ground in a mortar and then mixed with the other components before applying the dry rub all over the beef.

dry-rub-mortar

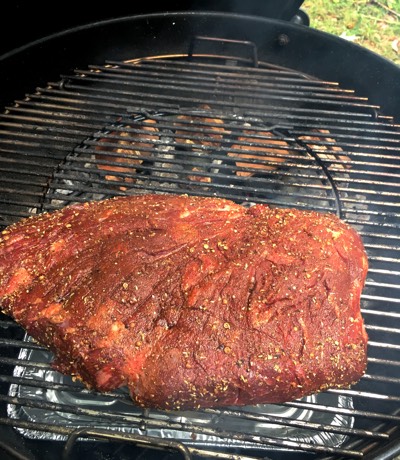
To smoke the meat, I used a Weber kettle grill and smoked the meat for about an hour. It’s important to smoke *before* you braise, not after. I used about a half-chimney of royal oak wood charcoal (I prefer that to briquettes), and about 4 chunks of cherry wood, which had been soaked in water for over an hour ahead of time. Once the coals were quite hot, I spread them on one half of the grill bottom, and put a pan filled with some water on the other side. Make sure you place the meat above the pan, and not directly above the coals (i.e. you want indirect heat). In this case, I ended up closing both the bottom and top vents, letting some air in only periodically. I made sure the temperature didn’t rise above 250F/300F because my goal was to get some smoke flavor, not dry out the meat.
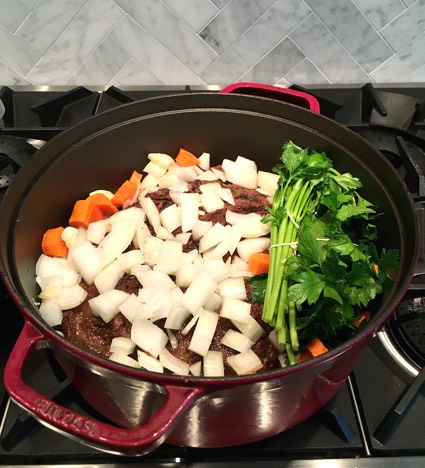
smoked-braise-smoking

smoked-braise-smoke

The Braise
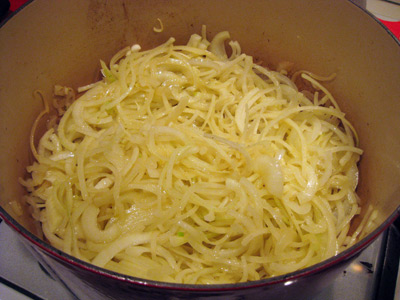
2 onions (spanish or vidalia), chopped
2 carrots, chopped
4 garlic cloves, peeled
bouquet garni of parsley and bay leaf (tied with white kitchen string)
2 cups of a dry white wine
beef broth or water

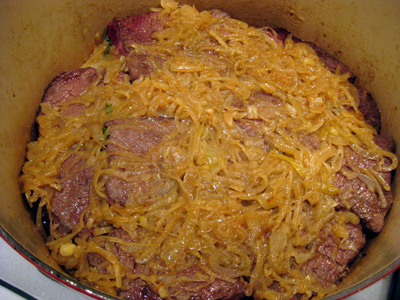
After an hour of smoking, I brought the meat back inside. I seared both sides on high heat in the dutch oven for about a minute a side, removed the beef to the side, and deglazed the bottom with a little bit of water. One of the onions, chopped, went on the bottom of the pan, and the beef was placed on top. Then I spread the remaining onion, carrot and garlic around and wedged the bouquet garni in the side. Two cups of white wine were added, and enough beef broth to bring the liquid to just over a third of the way up the meat. I had made a beef broth earlier in the day with beef shank, but you can just use water or all wine if you want.

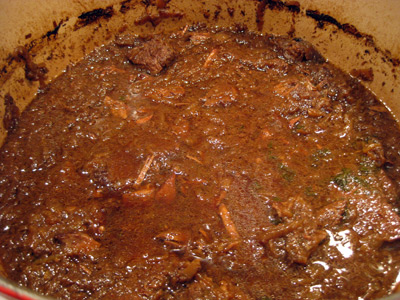
The oven had been pre-heated to 295F and the dutch oven, covered, went in for 5 hours. I let everything rest while guests arrived and we started the meal, and as we got closer to this course, took the meat out of the pot and popped it into the 295F oven in a baking dish to stay warm. The liquid fat at the top of the braising liquid was skimmed off, the bouquet garni removed, and then I used an immersion blender to puree all the vegetables into a sauce.

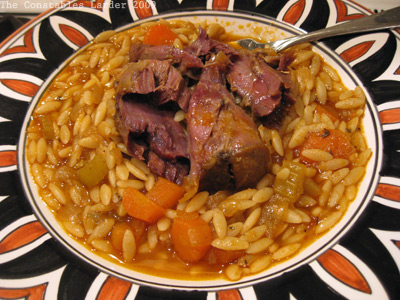
The last step was probably the most important. Even with just an hour of smoke, the meat had absorbed a lot of the smoke flavor, and on its own was a bit more “BBQ” than I was going for (albeit delicious). But paired with the sauce of the braising liquid, the combination balanced out perfectly into a delicious mix. Suffice it to say that there were no leftovers. Unfortunately, I was moving a bit too fast in the later part of this process to take pictures, but wanted to record this one as a success.

We paired this with some broccoli rabe that had been parboiled and then sauteed with a bit of garlic, lemon juice and hot pepper flakes. Oh, and a 2004 Barolo that we’ve been saving in our basement for years.

Chipotle Pork Shoulder Braise

pork-braise

Chipotle Pork Shoulder Braise

1 3-4 lb pork shoulder, bone-in
1 tbsp mexican oregano
2 chipotle peppers, in adobo sauce
2 ancho chiles, seeds removed
1 tin of fire roasted tomatoes
1 beer
1 large onion, chopped
5 cloves of garlic, minced
1.5 tbsp kosher salt
1 tbsp coriander seed
1/2 tsp cumin seed
10 whole black peppercorns
Lime slices

Tonight’s dinner was an off-the-cuff mental mashup of braises I have historically done and some flavors I’ve been trying via Rick Bayless recipes. The results were delicious. The spicey sauce was rich and delicious — very much like a mole sauce but without chocolate. For tonight’s meal, I worked with a 3lb pork shoulder but I’ll often do these kinds of dishes with a bigger piece.

Preheat your oven to 290F or 300F. (it will be fine at either, but lower and slower is better if you have the time)

Heat up your dutch over on a high flame. Once the pot is hot, add a little oil and sear the sides of your pork shoulder. By the way, if your butcher leaves the fat on the pork shoulder, score it with a knife first one way, then perpendicular to the first cuts, but don’t take it off!

Once seared, remove the pork shoulder, turn the heat down to low and toss in the onions. It is actually a good thing for this dish for you to let the onions brown a bit with the very hot surface, so don’t over-stir them, but make sure they do not burn.

With a mortar and pestle, loosely grind the coriander seed, cumin and peppercorns, and mix those in along with the mexican oregano (a different herb from Italian oregano). Then add the garlic (you want to wait to this point to add the garlic so that the pot has cooled a bit and doesn’t instantly burn the garlic turning it bitter). Add in the ancho chiles and chipotle peppers (with a little of the adobo sauce if you got them from a tin).

Turn off the stove top heat and place the pork shoulder on top of the onions, fat side down.

Sprinkle the salt around, and add the tomatoes around the pork. You can fire roast your own tomatoes simply by charring them underneath your broiler, but I was pressed for time so simply used a tin of Muir Glen fire roasted tomatoes, which supermarkets around here have started to carry.

Pour in a beer — in this case I used a mexican-style lager. You want the liquid to be about a third of the way up the side of the pork. Add more beer or water if needed.

Cover your dutch oven, place in the oven and cook. About half-way through, turn the pork so that the fat side is up.

If you have a 2-3 lb pork shoulder, about 4 1/2 hours is enough. For a 5-6 lb shoulder, expect about 6 hours. You want the meat falling off the bone and easy to pull apart with a fork.

Move the pork to a cutting board and use two forks to pull it apart. Sprinkle with salt (and taste for salt).

Skim excess fat off the top of the liquid and vegetables in the pot, and then puree it with an immersion blender to create your sauce.

Serve with white rice and some lime pieces. The lime sweetens the dish and brings out the flavors even more.

Brisket w Bacon, Tomatoes and Poblano Peppers

Hoo boy, it has been a long time since I have written a post here.  The startup is the guilty party of course. I’ve been cooking, but mostly variations of things already found on here.  This weekend I did a variation on brisket that I wanted to record.

4 or 5 lb brisket, from the lean end (in this case, grass-fed)
1.5 tbsp smoked paprika
1.5 tbsp kosher salt (if you use regular salt, use much less)
2 poblano peppers
4 or 5 pieces of bacon
2 spanish onions
1 28oz tin of whole, peeled tomatoes
7 or 8 cloves of garlic, peeled
7 bay leaves
2 sprigs of oregano

Preheat your oven to 275F.

Remove the excess fat from the top and bottom of the brisket, and rub the salt and paprika all over. Get your dutch oven nice and hot, splash a little grapeseed oil down, and quickly sear both sides of the brisket. Remove to the side, turn the heat way down, and saute the onions until translucent, then add the tomatoes.  Chop up your fresh oregano and mix in, along with half of the bay leaves.

Remove the stem and seeds from the poblano peppers.  Nestle the brisket on top of the onions and tomatoes, and wedge around it the poblano peppers, garlic cloves, a half cup of water, and the remaining bay leaves. Lay the bacon strips on top. Cover and cook in the oven for 5 hours, flipping the brisket halfway through, but keeping the bacon on top.

When done, remove the brisket and set aside on a carving board.  Slice across the grain to serve.

To make a sauce, remove the garlic cloves, bacon and the bay leaves. Skim as much of the oil/fat from the top as you can. Then blend the rest together with an immersion blender. Taste for salt. You might also brighten the sauce up with some fresh herbs such as parsley and/or oregano.

Ratatouille Beef Braise

ratatouillebraise

Welcome to 2010 everybody (although compared to our relatives in Australia, we are *so* late to the party). The last decade was certainly an interesting one for us.  Where did these two kids come from?  Here’s hoping for a great next ten!

This recipe was simply an inevitability in this household.  I love braises. I love ratatouille. Why not do them together? I mean, come on, we’re talking about *fewer* pots here.  WIN.

Ratatouille Beef Braise

3 lb hunk of chuck or rump beef, trimmed of excess fat
1 large spanish or sweet onion, diced
1 large eggplant, cut into ~1″ cubes
3 green zucchini, halved and cut into 1/2″ slices
1 green pepper, diced
5 or 6 garlic cloves, peeled
handful of mushrooms, roughly chopped
1 28oz can of whole peeled tomatoes
1 15oz can of diced tomatoes
bouquet garnis of parsley, bay leaf
1 tbsp dried oregano
salt and pepper
olive oil
1/2 cup of vermouth or white wine

Pre-heat oven to 300F.

Liberally sprinkle salt and pepper on the outside of your beef, and sear each side in a dutch oven. Remove to the side.

Add a couple tbsp of olive oil to the pot and saute the onions on medium-low heat for 10 or 15 minutes, then turn the heat up to medium and add the eggplant and cook for 5 to 10 minutes before adding the zucchini. Cook for another 10 minutes, then add everything else: the green pepper, mushrooms, tomatoes (and their juices), oregano, vermouth/wine and a tsp of salt. Cook for another 10 to 20 minutes, then nestle the beef in the middle. You don’t want the beef to be swimming, but make sure there is liquid up about 1/3 of the side of the meat, so add water (or more wine) if necessary.

Cover the pot and place in the oven. Cook for an hour then flip the beef and cook for another hour. At this point, taste the vegetables for salt and oregano, and return the pot to the oven uncovered. Cook for another 2 hours, turning the beef every 30 minutes or so.

ratatouillebraise-cut
The braised rump before plating.

Slice the beef against the grain and serve with rice and a fresh vegetable like green beens or broccoli.  Skim excess fat from the ratatouille, and generously spoon it over the beef on the plate (and possibly over the rice too).

There you have it, as best as I can remember.  The leftovers were awesome.  And now you’ll have to excuse me because kiddo is napping, Lisl and munchkin and guests are off skiing, which means there’s two things on my agenda: get a stew on the pot, and get some work done.  Happy new year!

Easiest damn (good) braised brisket ever

brisket

It has been quite a ride the last few months.  This week I’m incorporating a new tech startup, with a co-founder I couldn’t be more pleased to be working with.  More on that to come (and thank you to those who took my first survey).  I’m loving being back at the ground floor with an idea I’m passionate about.  Obviously my time is crunched, but that doesn’t mean I still don’t need to put good food on the table!  The only trouble is that I have to speed some things up, and I can’t be quite as creative, ambitious, or exploratory.  I also need to carve out a little more “fun” time to catch up on the food blogs of so many people I have come to both like and admire out there.

This recipe is not radically different from other beef braises I have done, but in this case I chucked out any step that didn’t feel completely necessary (like searing the meat beforehand).  You know what? It took minutes to throw together and the results were still awesome.

Brisket Braised in Beer

4 or 5 lb brisket
1 and a half large spanish onions (or yellow, vidalia, white)
5 garlic cloves, peeled
1 28 oz can of crushed tomatoes
1 beer (in this case I used sapporo)
3 bay leaves
1 tbsp dry oregano
salt and pepper

Set the oven to 300F.  Salt both sides of the brisket liberally (I like using kosher salt).

Chop your onions and place half in the bottom of a dutch oven large enough to fit the meat (it is ok to squeeze the meat in — the brisket will shrink as it cooks).  Place the meat on top, and then scatter around the rest of the onions and the garlic cloves.  Pour the crushed tomatoes on top, scatter the bay leaves, oregano and a little freshly ground pepper on top, and pour in the beer.  Cover and place in the oven.

Stick in the oven for about 6 hours, flipping half way through.

When you serve the meat, don’t forget to cut across the grain, and it’s great with a little coarse salt on top.

The braising liquid and vegetables become a fabulous gravy.  Just spoon out any liquid fat on top, spoon some into a food processor, and blend.  Taste for salt and pepper.

Pork Shoulder Braised with White Wine and Napa Cabbage

pork-braise-napa-cabbage

I keep on playing around with pork shoulder braises, and what’s not to love? They make a great meal, and the leftovers can be used in a myriad of ways such as pulled pork sandwiches, stews, chilis, meat pies, etc.  The picture above was the only one I had time to grab for this recipe, but I was so happy with it, I wanted to record it up here.  I made it the night before, so putting on dinner the next day was a snap, and boy was it good!

Pork Shoulder Braised with White Wine and Napa Cabbage

5 or 6 lb pork shoulder butt, on the bone (preferably Berkshire pork)
1/2 lb slab bacon, 1 to 1.5 inches thick
1/2 napa cabbage, sliced 1/4″ thick
3 medium vidalia or yellow onions, chopped
2 carrots, chopped
2 celery stalks, diced
4 or 5 cloves of garlic, minced
1 1/2 tsp fennel seed
1 tsp coriander seed
bouquet garnis of parsley, winter savory, and 2 bay leaves, wrapped in string
salt and pepper
dry white wine
water
grapeseed oil

Preheat oven to 300F.  In a mortar and pestle, coarsely grind the fennel and coriander seed.

Remove the skin from pork shoulder and score the fat. Rub 1 tsp of salt and the ground spices around the pork, let it come to room temperature for 20 minutes or so. Heat a splash of grapeseed oil in a dutch oven until very hot. Sear all sides of the pork and then remove to the side.

Slice the slab bacon 1/2 inch thick and brown it in the dutch oven, then turn the heat down to medium and remove the bacon to the side as well.

Saute the onions until they start to turn translucent, then add in the carrot, celery, garlic, and spices.  Place the pork shoulder on top and pour in half a bottle of white wine.  Bring the liquid about 1/4 up the side of the pork, adding water if needed.  Scatter  the slab bacon around, place the bouquet garnis in the pot, and scatter around the napa cabbage.  Cover and cook for two hours, then flip the shoulder and cook for another 2 hours.

Remove the pork shoulder to a cutting board and let cool for 15 minutes, then using two forks gently pull the shoulder apart to separate the bones and fat from the meat.  Also remove the slab bacon.  If you refridgerate the pork and bacon overnight, as I did, then slice any large chunks of pork into half-inch-thick pieces, and sear the meat on both sides in a hot non-stick skillet.  Do the same with the bacon, and plate, grinding some coarse salt and pepper onto the pork.

If you are serving the braise immediately, skim the liquid fat off the top of the braised vegetables in the pot. If you put in the fridge overnight, the fat will solidify on the top making it much easier to remove.   Re-heat in a pot, not a microwave!  Ladle several large spoonfuls into a food processor and blend into your gravy.

With a slotted spoon to drain excess liquid, plate some of braised vegetables next to the meat and serve with a side of your choice — in our case, Lisl made a salad of fresh peas (parboiled and then immediately cooled in ice water), jicama, red onion, and cherry tomatoes, with a lemon juice, olive oil and thyme dressing.

Pork Shoulder Braised with Ginger, Fennel, and Citrus

Every once in a while, I have to jump up and down waving my hands, hoping that some of you try a particular dish. This is one of those times. Alas for the vegetarians. Ginger, fennel, soy sauce, garlic, lime, orange, pork and a low-slow braise, oh my! I never knew how well ginger and fennel go together.

The meal began when I made another pilgrimage to Fleishers, the exquisite butcher in Kingston NY, and walked away with a bunch of goodies including a 3lb berkshire pork shoulder. As everyone knows, great ingredients make great meals, and berkshire pork is far-and-away superior to the overly-lean pork you get in American supermarkets. I like working with bone-in cuts; flavor is better and I like the texture that comes with gently shredding the meat away from the fat and bone at the end.

Wanting to try a new flavor profile with the pork, I turned to the Internets and discovered an interesting recipe on Epicurious. I didn’t really follow the recipe’s methods, but the flavor inspiration was fantastic. The braised fennel was transported some something entirely new.

Continue reading “Pork Shoulder Braised with Ginger, Fennel, and Citrus”

Carbonnades a la Flamande (Beef and Onions Braised in Beer)

I wonder, as I stumble through the flurry of activities that inevitably follow the arrival of a newborn, if a slight halo of awe still hovers around me. When our daughter arrived almost 4 years ago, the C section at 34 weeks was mentally intense and nerve wracking, albeit ultimately wonderful. Natural childbirth (and for little James, Lisl chose to go entirely natural, without pain medication), on the other hand, was incredibly intense in a physical way and in some ways very surreal.

I was surrounded by women supporting a woman doing something powerful and fundamental, common and yet never ever mundane. It was amazing. The object of my awe is, of course, Lisl. Such strength and bravery through the 41 hour labor process was magnificent to behold. I know that these are not unique feelings in a husband after the birth of a child, yet the very ubiquity of my emotions is one of the quirks of this thing called childbirth. It is commonplace and continual, and yet so colossal every single time. I never quite grasped that until now.

However, the title of this blog post isn’t “ruminations on childbirth”. Food! I wanted Lisl’s first meal home from the hospital to be excellent, but I also knew that I was only going to have sporadic time available… it needed to be something I could start the night before. Richard Olney has a great recipe for beef and beer stew, but I decided to try merging two different Julia Child inspirations: Onion Soup and Carbonnades a la Flamande (beef and onions braised in beer).

French onion soup gets so much flavor from the long cooking and carmelization of the onions, so I brought that step to this recipe. The sweetness of the extra-carmelized onions complements the beer really well. I did not use any beef broth or water; rather the beef and onions was braised entirely in a “black and tan”, i.e. one stout and one pale ale (there’s lots of flexibility on beer choice — it’s very personal preference: Julia Child calls for a pilsner-type beer, and this is also really good with a Belgian abbey-styled brew).

I cooked the braise for a very long time on low heat, and the results were rich and delicious. When it received high compliments from both Lisl and my visiting mother, who got me started with a love of cooking, I knew that this was a winner. I do not have a photo of the plated dish, but with new baby and visiting family, I’m sure you will let me off the hook!

Carbonnades a la Flamande (Black and Tan)
(Beef, Onion and Beer Stew)

3 lb chuck steak
5 or 6 medium to large yellow or spanish onions
3 tbsp unsalted butter
1 tbsp olive oil
2 tbsp brown sugar
salt
handful of parsley w/ stems
1 bay leaf
1 bottle of a good stout beer (Guinness most common)
1 bottle of pale ale (Bass or Harp)

Pre-heat oven to 300F.

Cut the beef into slices about 2 inches by 4 inches, and 1/2 inch thick. In a dutch oven, heat a splash of olive oil on medium-high heat until a drop of water sizzles, then brown the beef in batches, adding more oil as needed between batches.You just want to sear the outside, but not fully cook the beef. Cook the meat in batches so that the beef is not packed in too closely together. Set the browned beef and any juices aside on a large plate or bowl. Deglaze the bottom of the pot with a small amount of water and pour the juices over the beef.

Place the pot back on the stove top. It is now time for the onions.

carbonnades

Peel the onions, cut them in half, and then slice them very thin. On low, heat 3 tbsp of butter and 1 tbsp of olive oil in a dutch oven or stewing pot, and slowly saute the onions for 15 minutes. Stir in 1/2 tsp of salt and 2 tbsp of brown sugar, turn up the heat to moderate, and cook for 30 to 40 minutes until the onions are golden and starting to brown. Turn off the heat and remove onions to the side.

Create a layer of half the beef on the bottom of the pot, then spoon half the onions on top and spread around. Tie the parsley and bay leaf together with kitchen twine and place on top of the onions. Sprinkle a pinch of salt around.

Then create a layer with the rest of the beef, and top with the remaining onions and a pinch of salt sprinkled around.

carbonnades

Pour in the beer until the beef and onions are just covered. For me, it took the full contents of both the bottle of stout (in my case, I used Keegan’s Mothers Milk) and bottle of pale ale. Bring the stove burner back up to a moderate flame. When the beer is just starting to simmer, cover and place in the oven.

carbonnades

Cook for 2 hours and then uncover and continue to cook for another hour or two until the liquid has concentrated down somewhat and the meat is completely tender. Skim the fat oil off the top. Taste the remaining liquid, and adjust the flavor with a sprinkle of salt or brown sugar if you desire.

carbonnades

The above picture was actually taken after I had served much of the top layer of beef, which is why the meat looks so shredded because it really falls apart at the lightest touch at this point. However, I wanted to show color and consistency.

I served this with basmati rice and swiss chard sauted with a touch of lemon juice, and my father brought the most amazing red wine. It was a fitting celebration of Lisl and the new baby.

Note: if you like cooking beef and beer, check out our pot roast in beer recipe

Braised Lamb Shanks with Orzo

One thing I love about cooking is the freedom to embrace influences and the cumulative lessons of history. As a cook, one can learn from a rich body of experience built up within and across cultures, while preserving one’s own sense of self and style. In other words, derivative doesn’t have to be a bad word when it comes to cooking. The global synthesis of culinary ideas is celebrated.

This freedom is more fleeting in art, where there is a stronger fear of being derivative, partially driven by an art economy that places “new” on a pedestal. In food there is certainly a celebration of innovation, hence the fame of E Bulli and Alinea, but perhaps because cooking is as physical as it is mental, there is a greater acceptance, even glorification, of tradition and the merger of past and present. The physical also provides boundaries for how far things can be stretched. If something tastes bad, no amount of curatorial exposition can explain it into a good experience (though no doubt, some try).

So why the long introduction? Well, this recipe was triggered because I dropped by a lovely Greek food blog, Kali Orexi, and saw Maria’s chicken baked with orzo. Stopped the mental presses. Slammed on the browser brakes. I knew one thing at that moment: I had to bake the lamb shanks lurking in my fridge with orzo.

Then I spent an enjoyable part of this morning researching lamb shank cooking techniques in order to synthesize my own dish. I traversed numerous cookbooks (Child, Boulud, Tanis, Brown, etc) and many websites/blogs (Epicurious, Cookstr, Simply Recipes, Wednesday Chef, etc), and got some good ideas and discovered some cool things for future recipes.

The end results of this particular meal were fabulous. I do not always love lamb, but the flavor combinations were great, and I was also working with very young lamb carried by Fleishers, my favorite butcher. After flubbing a dinner on Friday night (I managed to create a tasteless pork chop brine, it seems… yes, the talent!), it was quite a relief to believe that I can cook after all! When an Aussie tells you that you did a good job with lamb, I think that means you can feel a sense of accomplishment, even if she is your wife (or should that be, especially?!).

braised lamb shank w orzo

Braised Lamb Shanks with Orzo
Serves two or three

2 lamb shanks (approx 1 lb each)
1 large vidalia or spanish onion, chopped
3 medium carrots, peeled and chopped
1 celery stalk, chopped
1 1/2 tbsp tomato paste
3 garlic cloves, peeled
4 stalks of parsley
1/2 cup of dry vermouth
1 to 2 cups of chicken broth
2 pinches of ground savory
2 pinches of ground sage
2 pinches of dried thyme (or a few stalks of fresh thyme)
1 bay leaf
salt and pepper
1 cup orzo

For prep, preheat oven to 300F and heat up your chicken broth in a saucepan or microwave.

Lightly salt the shanks. On a high flame, heat up a healthy splash of olive oil in a dutch oven large enough to fit the lamb shanks, and brown all sides of the lamb shanks, then remove the shanks to the side. Immediately lower the heat to medium-low and place the onions in the pot, stirring for a few minutes, and then add the carrots and celery. Cook for several minutes and add in the tomato paste, and cook for several more minutes.

Deglaze the bottom of the pan with the vermouth, and then place the shanks back in the pot. Add in enough chicken broth to reach about halfway up the shanks. Add in the garlic, herbs, bay leaf, and 1/4 tsp coarse salt.

Cover and place in the oven. Braise for 2 to 2 1/2 hours, turning the meat every hour.

Near the end of the braising period, bring a large pot of water to boil. You will use this to partially cook the orzo before adding the pasta to the dutch oven.

Remove the dutch oven from the oven, and remove the shanks to a side plate. Discard the garlic cloves. Spoon out the fat/oil from the surface of the liquid (this is the most painstaking part of this entire recipe). While you are doing this, boil the orzo for no more than 5 or 6 minutes in your pot of boiling water. Reserve about 1/2 cup of the starchy water (although if there is very little liquid left in your dutch oven, you might reserve a bit more), and drain the orzo.

At this point, you should have skimmed as much oil as you can from the top of the liquid and vegetables in the dutch oven. Stir in the 1/2 cup of orzo-cooking water, and then stir in the orzo itself. Place the shanks back on top, and return to the oven, uncovered, for 15 more minutes.

Finally, remove the shanks to the side, remove the meat from the bones and gristle, and sprinkle with a little salt. Taste the orzo and vegetables for salt and pepper (I found that this dish wanted a lot of ground pepper, but do so to your taste). Serve the lamb on a bed of the orzo mixture.

This dish pairs nicely with a relatively full-bodied red wine, such as a strong zinfindel but a shiraz or cabernet sauvingon would also be nice.

A Winter Menu: Braised and Seared Pork Shoulder

winter menu

Picture a room with a roaring fireplace, the clink of silverware and careful placement of a wine glass, and the low murmuring of well-dressed guests enjoying their food to the detriment of general conversation.

Now make the room smaller. No, even smaller – don’t worry, I won’t be offended. Take away the fireplace (I wish!), silverware (never did justify splurging on that), and most of the guests (oh yes, and the well-dressed part). You see, when most of your friends have kids, one needs to provide more than 24 hours notice, which in turn requires being organized. Somehow the only thing I was organized about was the food (what a surprise, my wife says).

Still, we managed to throw a little ad-hoc dinner party on Friday night. The cornerstone of the meal, a braised and seared pork shoulder, I will share here. A pork shoulder does not require a lot of hands-on attention, but it does demand time. Time to season. Time to braise. And best of all, time to eat over the course of a luxurious meal with good company. I did not take the time to do much in the way of photography, but you will forgive me, won’t you?

pork shoulder, crisp

Braised and Seared Pork Shoulder

As always, start off with the best ingredients you can. I had picked up a 5lb, on-the-bone pork shoulder from Fleishers, which carries the best pork I have found in this part of the country. I don’t have a picture of this particular cut, but as you can see in my Pork Shoulder Braised w Dried Chiles post, Fleishers leaves the skin and fat on the shoulder. Leave it on! Just score it with a sharp knife in a criss-cross fashion through the skin and into the fat (if not already done) so you can rub in salt and spices.

Dry Rub
1/2 tsp coriander seed
1/2 tsp mustard seed
1/2 tsp black peppercorns
1/2 tsp cumin seed
approx 2 tbsp salt

Braise
5 lb on-bone pork shoulder (or slightly smaller boneless)
1 large spanish or vidalia onion, roughly chopped
3 medium carrots, roughly chopped
2 celery stalks, roughly chopped
1/2 tsp juniper berries
2 bay leaves
3 cups of homemade chicken stock (or water)

One to three days before you are making the braise, wash and dry the pork shoulder. If the skin and fat remains on the cut, score it in a criss-cross fashion with a sharp knife. Grind up the coriander, mustard, pepper and cumin seeds. Rub about 2 tbsp of salt all around the pork shoulder, then rub in the ground spices. Wrap it back up and place back in the fridge until you are ready to cook the braise.

pork shoulder rub

On the day of the braise, remove the shoulder from the fridge and let it come to room temperature for about 20 to 30 minutes. Pre-heat the oven to 325F.

Scrape off as much of the dry rub as you can and reserve the spices (on the side, or just spoon into the chicken stock you will be using).

On high heat, heat up a couple tbsp of olive oil in a dutch oven big enough to hold the shoulder. Get the oil hot enough that a drop of water sizzles and pops, then sear the shoulder on all sides for about 2 minutes a side. Turn the heat down to low, and remove the pork shoulder to the side.

Toss in the onion and stir so that it does not burn in the still-hot dutch oven. Cook for a few minutes until it starts to turn translucent, then pour in a little of the chicken stock to deglaze the bottom of the pot.

Place the pork shoulder on top of the onions, and scatter in the carrots, celery, juniper berries, and bay leaf. Pour in the chicken stock (or water) and turn up the heat to bring the liquid to a simmer. Make sure the spices you took off the shoulder before searing are added back in.

Cover the pot and place in the oven and braise for about 4 hours, turning the shoulder once or twice. If you feel like the liquid is bubbling a little too hard, lower the heat further another 10 or 15 degrees.

Completing the dish
When the braise is done, carefully remove the shoulder, now very tender, to a carving board. Remove the fat and skin from the top of the shoulder (it should slide off very easily), and place to the side (if you desire, you can make a lovely heart-attack-inducing crackling out of this by adding some more salt and spices and tossing back in a 450F oven on a baking tray, until crispy).

Skim and remove the liquid fat from top of the braising liquid. Using an immersion blender, blend together the braising liquid and vegetables remaining in the pot into a thick gravy (if no immersion blender, remove several large spoonfuls of liquid and vegetables to a food processor and puree).

Carefully carve 3/4 inch slices from the pork shoulder. It will fall apart some, but that is fine; this dish is not about looking neat, but rather tasting amazing. Heat up a large non-stick frying pan on high heat, and then sear both sides of your pork shoulder slices for about 30 to 60 seconds per side. Plate, pour the gravy on top, and serve. This pairs nicely with a solid Rhone red wine.

Other menu notes:

The bulk of the meal is very rich, so if you want a starter, keep it very light. I recommend a small green salad with a mixture of radicchio and lettuce, a few sliced cherry tomatoes, and possibly some endive and/or walnuts. Whip up a dressing with olive oil, red wine vinegar, a tiny dash of balsamic vinegar, grain mustard, salt, pepper, and dried basil or thyme. I like to serve this with a crisp white wine or a fairly dry sparkling wine.

The potato and fennel gratin was a larger version of the recipe you can find in this post (link), albeit using more half-and-half than heavy cream, a bit more fennel than before, and jarlsberg cheese instead of gruyere.

The pork shoulder recipe was inspired by this one from an old Gourmet, but I made a fair number of changes. I did like their idea of searing the braised meat at the end, and enjoyed the extra texture this added to the mouthful, however if you want to omit this step the braise will be completely delicious without.

Lisl finished off the meal by making a sticky toffee pudding from a Jamie Oliver recipe. It was delicious but I know she wanted to make some changes, so we’ll post our version when it comes to life.

We finished off the meal with tea and a few of us partaking in Acquavite, an Italian pear brandy. Yes, it was an indulgent night.

sticky toffee pudding