Marcella’s Op-Ed; Stewed Meatballs and Brussel Sprouts

Before I get to food, did you see Marcella Hazan’s op-ed in the New York Times the other day?

She bemoans the overuse of the word “chef” rather than “cook”, and what that means for food culture today. She misses “the old world of Mediterranean family cooking, a world where satisfying flavors had been arrived at over time and by consensus.” She then writes, “that world hasn’t disappeared, but it has receded, making room for a parallel world, one where food is often entertainment, spectacle, news, fashion, science, a world in which surprise — whether it’s on the plate or beyond it — is vital. This is the world of chefs.

That sounds a lot like the shift in the art world during the 20th century, where innovation and surprise took precedence over quality, or rather, defined quality.

I wonder how much of this is true in the food world; how deep does this penetrate, and is it restricted to the major urban centers? Yes, there is clearly a general fascination with molecular gastronomy today, and I celebrate the experimentation going on. I don’t think it threatens the core of cooking, but then again, Marcella does use the word “receded” not “replaced”.

Professional critics and writers, looking for new ways to keep themselves inspired in their trade, no doubt admire and appreciate surprise, but this attitude is by no means universal. If Top Chef can be viewed as a cultural bellweather, it is interesting to note that the judges love innovation but do not hold it above all else, otherwise Marcel Vigneron and Richard Blais would have won their seasons.

In any case, time for this cook to talk about brussel sprouts…

Stewed Meatballs and Brussel Sprouts

pork meatballs

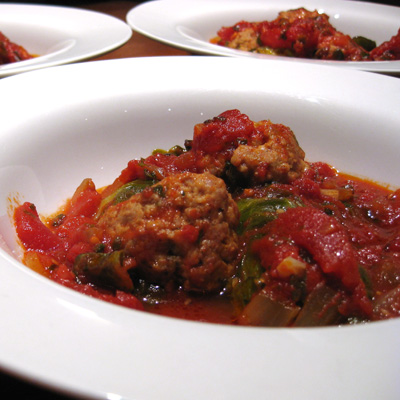
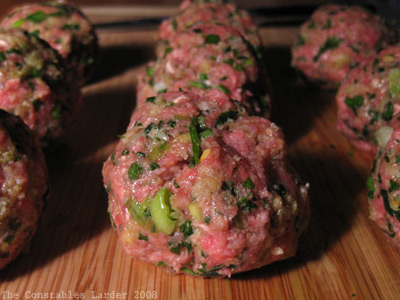
I have a very simple dish to post today. Lord knows I love variations on stewed meatballs. My wife can’t stand hamburgers, which I jokingly say is un-American since she is, of course, not American! However, she loves these meatball dishes I play around with. In this case, I used pork and put brussel sprouts to very good effect.

I had 1 pound of ground pork leftover from Thanksgiving, and being in the mood to avoid turkey, I made small meatballs with the following mix, pulsed finely in a food processor:

a hunk of stale bread (crust removed)
half of an onion
1/3 tsp fennel seed
1/4 tsp ground cumin
a pinch of arbol pepper flakes
a tbsp of chopped fresh oregano (use less if using dried)

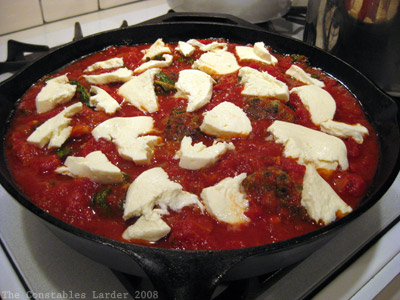
At the same time, I whipped up a quick tomato sauce, using canned tomatoes, onion, garlic and fresh rosemary (still alive in our garden, but it never survives the winter).

I washed and halved a dozen large brussel sprouts and pre-heated oven to 375F.

I browned the meatballs in a cast-iron pan, removed to a plate, and browned the brussel sprouts cut-side down for a few minutes, then gave them a big stir, added in the meatballs, poured the tomato sauce on top, and popped in the oven for 30 minutes or so.

The brussel sprouts taste a bit like braised cabbage here. Granted if you don’t like sprouts *or* braised cabbage, this combination is probably useless to you! Just toss those meatballs in with your pasta. However, in our household this dish was wolfed down by adult and Munchkin alike.

Beef Stew (our version)

beef stew plated

I am chained to the bed today, fending off percocet-induced fuzziness after minor surgery yesterday (not to worry, I should be up again in no time). Lisl had to stay home from work to help me, and one lovely side benefit is the wonderful smell of baking bread wafting through the house. In between attempts to get work done, I’ve been catching up on food blogs, flipping through cookbooks, twittering more than usual, and trying to think how I can be as funny as Zen. I’ve decided that I need to accept my limitations. 🙂

I also decided to update my beef stew recipe on here since I made a big batch right before heading to the hospital (when I was still allowed to lift my dutch oven) and took a few pics of the process.

Most food bloggers probably have their own favorite beef stew recipe; ours comes from my mother, and one day many years ago I took notes as she put it together. She cooks the dish by feel so it is never exactly the same, but the basics are as follows:

2 medium onions, diced
2 cloves minced garlic
10 mushrooms (white or cremini), thickly sliced
2 pounds round or chuck beef
flour
5 carrots, thickly chopped
5 stalks celery, chopped
2 large russet potatoes, cut into large chunks
large handful of green beans, ends removed and cut into 1″ pieces
1.5 cups frozen peas
3 bay leaves
1 cup red wine
2 tbsp tomato paste
very large handful of parsley, chopped
1 tbsp oregano
salt & pepper

Trim some of the excess fat off of the beef, but leave some to add richness. Cut the beef into cubes of preferred size (I do rough cubes of about an inch) and lightly flour on all sides.

beef stew 1

Start boiling a kettle of water (or a medium pot) and pre-heat oven to 315F.

In a large oven-proof pot such as a dutch oven, heat some olive oil and saute the onions and garlic over medium-low heat. As they start to turn translucent, add in your mushrooms. Cook for several minutes

Remove the onions and mushrooms to a large bowl, add a little more olive oil to the pot, and brown the beef in batches over slightly higher heat (adding olive oil as necessary). Just brown the beef, do not cook. Remove the beef to the bowl with onions and mushrooms, and deglaze the bottom of the pot with some of the boiling water.

Your kitchen should smell amazing at this point. 🙂

Turn the heat down to low, and then return the meat, onions and mushrooms to the pot. Add everything except for the green beans and peas. Add 1 tsp of salt (you’ll probably want more, but can add to taste later). Add the wine and then pour in boiling water until the water level is just below the tops of the meat and vegetables.

beef stew 2

Bring to a bubbling simmer on the stovetop, then cover and place in the oven for an hour. After an hour, skim any excess oil off of the top, then stir in the green beans and peas, and taste for salt. Return to the oven for another 2 hours, periodically pulling it out for a stir. The longer you can slow-cook it, the thicker it should get as the vegetables break down and thicken the stew. (you don’t want to try to thicken it by boiling off liquid)

beef stew 3

I wait to add pepper until serving, and will often add some freshly chopped parsley. While it is very good on its own, we often serve with egg noodles or rice.

A few notes:
If you need to cook your stew on the stovetop, do your best to keep the simmer very light, and stir regularly especially if you have a thin-bottomed pot, because you do not want the bottom of the stew to burn. That happened to me once and the burnt flavor permeated the whole thing!

You can totally mix up the amounts of each vegetable to fit your flavor profile, or add more red wine to make it richer, or use rosemary instead of oregano, etc. This last stew I made (which is where the photographs came from) included some san marzano tomatoes, chunks of celery root, a jalapeno pepper, and we did not have any peas. It was delicious, but the base recipe my family likes to work off of is as described above.

Meatloaf Meets Thanksgiving Stuffing

I love my mother’s meatloaf recipe. Maybe that is not unusual, but I always find myself satisfied when I make it, and I am invariably disappointed when I try meatloaf in restaurants. The recipe for the original recipe is posted here, and I hope you try it.

Tonight however, as a prelude to the looming Turkey Day here in the US, I changed things up a bit and brought hints of Thanksgiving “stuffing” into my meatloaf. The reaction was gratifyingly positive, so I deemed it blog-worthy. Apologies for the less-than-great photo above, but it gives you a sense of texture.

(Note: what kind of stuffing do I love? It comes from a 1973 NYTimes recipe for Thanksgiving turkey that my mother cut out and we have been making ever since, because it is just that good!)

Meatloaf
1 lb ground beef
1 lb ground pork
1 large onion (spanish), finely chopped
8 white button mushrooms, finely chopped
3 stalks of celery, finely chopped
10 large black olives, chopped
1/3 cup walnuts, chopped
1 tbsp fresh sage, finely chopped (if you love sage, add more)
1 cup finely chopped parsley
1 tbsp worcestershire sauce
2 tbsp ketchup or tomato paste
1/2 tsp salt
1 egg
bacon

Pre-heat oven to 425F.

Heat up a splash of olive oil in a saute pan, and saute the onions until transparent. Add the mushrooms and cook for several minutes, and then add the celery. Cook for another 5 to 10 minutes, then turn off the heat and let cool.

In a large bowl, combine everything but the bacon. (note: I mix it all up with my hands, well-washed before and after)

In a large baking dish, shape your meatloaf. I usually mold it into a roughly-rectangular shape about 1.5 to 2 inches high and 4 or 5 inches wide. Then drape slices of bacon across the top.

meatloaf prep

Place in the oven, and after 10 minutes, turn the heat down to 350F. Cook for another 50 to 60 minutes — if the meatloaf is firm, it should be done.

We served this with a potato, brussel sprout and celeriac gratin (in milk) — good, but I want to continue to tinker with that recipe and improve it before blogging.

potato gratin

Stewed Meatballs with Arugula

stewed meatballs

What’s not to love about meatballs stewed in tomato sauce? It’s a timeless combination, no? I love to cook variations of a recipe I originally picked up from Jamie Oliver (I’m a big fan of his cookbooks). My original adaptation of the recipe is posted here. The other day, I remade it with some changes to the meatballs — there are so many directions you can go and still have it be delicious, as long as you don’t use spices that will conflict with your tomato sauce. The other major difference was the use of a big bunch of arugula instead of basil to add more body (I’m guessing that kale would be good as well).

For this variation, I created a simple tomato sauce that combined 20 oz of peeled san marzano tomatoes with some sauted onions and garlic, ground savory, dried oregano, a splash of red wine vinegar, and seasoned with salt and pepper.

Meatballs
1+ lb of ground beef
2 slices of italian / farm bread, pulsed into breadcrumbs
1/2 cup of finely chopped parsely
1 tbsp dried mexican oregano
pinch of hot red pepper flakes
healthy pinch of salt
1 egg

Combine everything and mold the mixture into meatballs. I made 9, each about an inch and a half in diameter. Then brown them in an oven-proof pan and then turn off the heat when browning is complete.

meatballs formed

Once the meatballs are ready to go and the tomato sauce meets your approval, turn off the heat to the tomato sauce and stir in a large bunch of torn arugula leaves (my guess is about 5 oz worth – considerably more than the amount of basil that went into the original recipe).

Pour the tomato sauce over the meatballs and add some chunks of mozarella cheese.

meatballs final prep

Place in an oven preheated to 400F and cook for 20 minutes.

Beef Pot Roast in Beer

braised beef sliced

Yesterday I decided to do another braise, and since so many of my creations lately have been tomato-based, I decided to riff off of the spice rub from a recent recipe from Sass & Veracity, her Beef Chuck with Vegetables in Red Wine. I used a dark beer and had a few other alterations, but the direction definitely came from Kelly.

But first I wanted to touch on an interesting discussion that Kelly kicked off a few days later that was focused on food photography/blogging and revolving around “food photo snobbery”. You should read her blog and the comments it elicited, but to pull a few lines, Kelly wrote: “The problems begin when a judgment is made about the quality of the dish by looking at the photo alone. If this is all about photos, then why post a recipe.” She also noted to me “If one is taking the time to think about content and “readers” are only scanning the pretty photos, then blogging becomes as impersonal as a pretty cookbook can be.

I can’t resist going big picture for a second. This notion of quality is a recurring one in this era of online creation. When blogging first gained traction, there were (and are) debates over writing quality. YouTube, Flickr, and Second Life — wherever there is “user generated content” — all spur discussions of good versus ugly.

I love this video by Ze Frank (Internet artist/philosopher for lack of a better description), where he’s riffing on “ugly” MySpace pages, and how the lowered cost of creation tools is opening up design to everyone, which is a very cool thing. (Ze is a trip of non-stop ideas — I once shared a taxi with him on the way to a conference and thought my head would explode, but in a good way).

When it comes to food blogs, I appreciate authors who put effort into their pictures (and I count Kelly as one of those). Food photography is damned hard. I’m fighting with it constantly, especially since I do not use fancy equipment of any kind. I like a blog post that shares not just via words and measurements, but through images as well. I’ve probably driven half of you away by this point with all this text and just one picture so far! But I sally on! My personal preference leans towards more natural photos, just as my food preferences lean towards “peasant food” rather than foams and haute cuisine.

Photography is an art form, and as such quality is a subjective thing. Everyone should have confidence in their own subjective tastes, and ignore self-appointed critics. Look to improve, but not to be something you are not! Robert Henri, an influential early-20th-century American painter (he led the Ash Can School / Group of 8), nailed it when he said of art: “The man who has honesty, integrity, the love of inquiry, the desire to see beyond, is ready to appreciate good art. He needs no one to give him an art education; he is already qualified.” (I should note that the Group of 8 got hammered by the art establishment of the time, so it’s no surprise that Henri was saying “stuff your pedigree!”)

Now, speaking of un-fancy photos, on to the pot roast, I mean braise, I mean whatever the heck it is! This one spent part of the time in the oven, and then was booted to the top of the stove to make room for Lisl’s loaf of bread. If it is both a braise and a pot roast, that make it a broast?

And for the record, I find that it is very hard to take pretty photos of braises once plated. I tried for this meal and they were so damn boring, I left them off.

Beef Pot Roast in Beer

2 lb beef chuck roast
2 tsp coarse sea salt
2 tsp peppercorns
1 tsp mustard seed
1 tsp sweet paprika
1 tsp smoked paprika
1 tsp dried oregano
1 tsp brown sugar
6 slices smoked bacon, sliced into 1/2 inch pieces
base of a bunch of celery stalks
1 dark beer (I used a stout)
1 cup of water
2 large onions, loosely chopped
2 bay leaves
4 cloves of garlic, peeled
4 large carrots, peeled
Handful of medium red potatoes, peeled

Preheat oven to 350F. In a mortar, grind up your mustard seeds and black pepper, then mix in the other spices (salt, paprika, oregano, brown sugar). Rub the mix all over your roast.
braised beef rub

In a dutch oven on the stove top, cook the bacon until almost crispy, then remove. Sear the roast on both sides and remove, and deglaze the pot with the beer and water.

Add the roast back in, and sprinkle the bacon and onions around. I also chopped the “foot” off of some stalks of celery to add flavor, and tossed in an extra celery stalk, 4 cloves of garlic, and a couple bay leaves.
braised beef start

Let this cook for 20-30 minutes at 350F, then lower to 290F. At the hour mark, flip the roast. Let this cook for another 2 to 3 hours, flipping the roast once more, then basting it every 40 to 60 minutes or so. Keep an eye that the liquid doesn’t get too low, and add some stock or water if it does (with the heat set this low, I did not have to add more). Add the carrots and potatoes with about 1 1/2 hours left and turn them about halfway through.

braised beef done

As noted, my pot was booted from the oven but I kept it warm at the lowest setting on our gas stovetop. I removed the roast, carved it across the grain (top picture), and served on a bed of egg noodles with the potatoes and carrots, generously spooning the fabulous liquid from the pot on top.

Skirt Steak rolled w Mushrooms and Ginger

No picture tonight, but then this is more of a note-to-self since I was surprised by how much I liked this spontaneous concoction tonight.

Skirt steak (just under 1 lb)
1 tbsp butter
1 yellow onion
Large handful mixed mushrooms
1 tbsp fresh, finely minced ginger
fresh flat-leaf parsley, finely chopped
apple cider vinegar
olive oil
salt and pepper

Peel your onion, cut in half, and slice into very thin half-rings. Clean the mushrooms (I used white button and “baby bella” mushrooms) and slice very thinly. Note: our skirt steak was quite small – fine for two people, but if you are making a larger amount, increase the amount of onion, mushrooms and ginger.

Melt a tbsp of butter and a splash of olive oil in a saute pan on low heat, and then cook the onions until they turn translucent. Add the mushrooms and continue cooking on low heat until everything is well cooked. Add a small pinch of salt and stir in the ginger. Cook for a minute or two then remove from heat.

Cut the skirt steak into two 8-to-10-inch long strips (our skirt steak was about 4 inches wide). Tenderize with a mallet to thin and widen the meat. Sprinkle salt, pepper and parsley on each strip, then add a layer of the mushroom mixture to the top.

Roll each steak strip up tightly and tie each roll at both ends with two lengths of wet kitchen string.

Sear the rolls on two sides quickly on a grill or under a broiler (hence wetting the kitchen string), then transfer to a small baking dish. Drizzle a little olive oil and a tsp of apple cider vinegar on each roll, then place in an oven set to 350F for 10 to 15 minutes. Remove string and serve.

Shepherd’s Pie pt. 2 (riffing on Kali Orexi’s riff)

shepherds pie pt 2

This is where the blogosphere gets fun. The other week, I blogged our usual Shepherd’s Pie recipe. Today I discovered that Kali Orexi (aka Maria), a blogger also here in the New York area, made her version (link to her post). So tonight, I bumped my previous cooking plans and riffed off of her version (not having the exact ingredients in my pantry) and loved the result. Thanks Maria!

The key differences are adding grated cheese to the potatoes, and using a different spice base for the meat mix. In some ways, this version is richer than our usual and I was glad to have an Italian red wine with decent body to accompany. Then again, I’m always glad to have a full bodied red, who am I kidding!

Mashed Potatoes Topping
6 large red boiling potatoes, peeled
1 cup milk
2 tbsp unsalted butter
1/3 cup grated parmesan cheese (or pecorino romano)
salt and pepper

Boil the potatoes in lightly salted water until cooked all the way through (or steam them). You can cut them into smaller pieces to speed cooking. Drain the potatoes, return to the pot, add the butter and mash. Add 1/2 tsp salt, 1/4 tsp pepper, grated cheese, and 1/2 cup milk. Taste for salt. Continue adding milk until the mashed potatoes are quite moist without crossing over into being liquid.

The Base
1 lb of ground beef
2 large cloves of garlic, minced
1 1/2 medium onions, or 1 large, diced
3 medium carrots, diced
2 small/medium zucchini, grated
1 tbsp tomato paste
1/2 cup white wine
1/3 to 1/2 tsp ground cinnamon
1/3 to 1/2 tsp ground all spice
2 pinches of ground cumin
pinch of ground nutmeg
1 to 2 tbsp ketchup
salt and pepper

In a cast iron or oven-proof pan, brown the ground beef and use the spatula to break it up into small bits. Cook with a few pinches of salt, cinnamon and all spice. Remove any excess liquid and set aside.

Preheat oven to 350F

Add a little olive oil to the pan and saute the garlic and onions until the onions start turning translucent, then add the carrots and a few pinches of salt, cinnamon, all spice, cumin, a pinch of nutmeg and some ground pepper. Cook for several minutes, then add the grated zucchini and tomato paste. Once that is folded in and cooking, add the wine. Let this cook for several minutes and stir in the ground beef.

Cook it all together for another five minutes and taste for salt and spices (I kept the spices at a level where they were there but still subtle). At this stage, I wanted to sweeten the mixture up a little bit more, so added the ketchup.

If the mixture starts to dry out, add a little bit of water. Once you are happy with the taste of the mixture, turn off the heat and flatten the top of the mixture. Carefully spoon your mashed potatoes on top, and using the back of a fork, smooth it around. As noted before, I like to then decorate the top with the tines.

Place in the oven and bake for 30 minutes, then turn the oven to broil and let the top brown (but not burn). Let the shepherds pie rest for a few minutes before serving.

shepherds pie pt 2

Doubled Braised Pork Chili

Chili (double braised pork)

I love chili, and this one is one of my best. I jokingly called it “double braised chili” because the pork shoulder is braised the night before, and then stewed in the chili the next day. I have also made the braise several nights before, served it as one meal, and saved the majority of the meat for cooking the chili.

Braising the Pork Shoulder (night before)
1 4lb bone-in pork shoulder or butt (upper part of shoulder)
3 dried ancho chiles, seeds and stem removed
1 dried chipotle pepper, seeds and stem removed
3 bay leaves
4 garlic cloves
2 tbsp salt
2 onions, chopped
1 green pepper, de-seeded and chopped (optional)
1 yellow pepper, de-seeded and chopped (optional)
2 cups dry white wine
water
olive oil

Pre-heat oven to 350F

Remove any excess fat from the pork shoulder. In a food processor, combine the ancho and chipotle chilis, bay leaves, salt and garlic and pulse until it is as finely chopped as you can get. Rub the mix all over the pork. In a dutch oven, lay a bed of the onions and peppers, and place the pork shoulder on top. Then pour in the wine and enough water to come a quarter of the way up the side of the pork. Cover and place in the oven, and after 20 minutes lower heat to 300F. Braise for 4 hours, turning the pork over halfway through. You can turn off the oven when you go to bed, leaving the dutch oven covered, and pick up the recipe in the morning.

You might also soak the beans overnight to speed things up the next day.

Making the Chili

Braised pork shoulder
3/4 cup dried pinto beans
3/4 cup dried mayacoba beans
3/4 cup dried vallarta beans
reserved bean cooking liquid
6 slices, thickly cut slab bacon
1 1/2 yellow onions, chopped
1 red onion, chopped
4 cloves garlic, minced
2 28 oz cans crushed or whole tomatoes (chopped)
1 1/2 tbsp tomato paste
2 jalapenos, sliced (with seeds)
2 tbsp ground cumin
1 1/2 tbsp dried mexican oregano
1 tbsp salt
3 bay leaves

Wash the beans and check for any small pebbles. In a large pot, cover with cold water, an inch over the top if they were soaked, and two inches if they were not. Bring to a boil, then lower heat, loosely cover and let simmer for about 40 minutes or until al dente. Remove beans and reserve the cooking liquid.

Remove the pork shoulder from the dutch oven, separate out the bones and excess fat, and using two forks shred the meat into bite size pieces. I used about 2/3 of the pork shoulder in the chili, saving the rest for lunch. Also reserve a ladel-full of the spicy braising liquid (albeit without the oil) and some of the vegetables.

Rinse and dry the dutch oven and place on stove top. Cut up the bacon into 1/2″ pieces and saute in the dutch oven until almost crispy, then remove from pan and turn off heat. Drain or spoon out excess bacon fat, leaving a tablespoon or so in the pan (or remove all, and add in olive oil). On medium-low heat, saute the onions and garlic until onions are translucent, then combine the rest: beans, bacon, shredded pork, spicy liquid/vegetables from the pork braise, tomatoes, tomato paste, jalapenos, and herbs. Add enough of the reserved bean cooking liquid (or stock, if that is your preference) until the chili is moist, but not yet soupy.

You can either cook this on the stove top at a very slow simmer or place in the oven at 280F. If the chili has too much liquid, let it cook uncovered for a bit (when I grabbed the above photo, it was still a bit too liquidy but still delicious). If it starts getting too dry, ladel in a little bit more of the bean liquid or stock you are using. Taste for heat, salt and spices and adjust to your fancy.

I usually cook this for several hours, giving the liquid plenty of time to concentrate and letting all the flavors mingle.

This chili was fantastic on its own, but we served with some raw chopped red onion, some freshly diced serrano pepper, and a dollop of greek yogurt.

Note on Beans
I have made this chili with various kinds of beans, and different amounts — do not feel bound to the above recipe at all. For a recent version of this chili, I used 1/2 lb of vaquero beans (which were hearty and darkened the chili to a wonderful color) with 1/2 lb of pebbles beans. A common mix in the US is pinto with red kidney beans and great northern beans.

chili snow

Shepherd’s Pie (my favorite comfort food dish)

Back in June, when we first started this site, I posted a number of old, favorite recipes including shepherd’s pie. When the air gets cool, Lisl and I find no comfort food more satisfying than this dish. My version was originally inspired by the Dean & Deluca cookbook, and I make it slightly differently almost every time. Tonight was no exception, so I’ll post tonight’s approach here and note the differences to the old recipe at the end.

Shepherd’s Pie

Mashed Potatoes (the top layer)
6 to 8 medium red or gold potatoes, peeled
1/2 cup milk (but be prepared to use more)
2 tbsp butter, cut into smaller pieces
salt
pepper
handful of parsely, finely chopped

Boil the potatoes in lightly salted water until cooked all the way through. You can cut them into smaller pieces to speed cooking. Drain the potatoes, return to the pot, add the butter and mash. Add 1/2 tsp salt, 1/4 tsp pepper, the parsley and milk. Taste for salt. Add milk – your exact amount of milk will depend on size and number of potatoes. You want the mashed potatoes to be quite moist without crossing over into being liquid. (Frankly, I would say make the mashed potatoes the way you really love to make them; just don’t make it too dry as this all is going to bake before being served).

The Base
1 to 1.5 lb of ground beef
5 slices of bacon
2 tbsp worcestershire sauce
1 large onion, chopped
5 or 6 carrots, finely chopped
3/4 cup dry white wine
1 tsp tomato paste
1/4 tsp dried oregano
salt
pinch of red pepper flakes (spicy)

Cook the bacon in a large cast iron pan to the point where they are almost crispy, then remove and chop. Cook the ground beef in the bacon fat until browned, adding in 1/2 tsp of salt, 1 tbsp of worcestershire sauce, and the dried oregano. Once browned, remove to a bowl.

Preheat oven to 350F.

Add a splash of olive oil to the cast iron pan and saute the onions on medium-low heat until they start to turn translucent, then add the carrots. Cook for 10 minutes, stirring occasionally, then turn up the heat slightly and add the wine and tomato paste. Continue to cook, stirring regularly, for another 5 to 10 minutes, then add in the ground beef, chopped bacon, another tbsp of worcestershire sauce, another pinch of salt, and the pinch of red pepper flakes. Let this cook together for 5 or 10 minutes, stirring occasionally, and taste for salt and oregano. You’ll note that I’m writing flexible cooking times, but I prefer more time when possible in order to let the carrots soften. If it starts to dry out, add a little more wine (or water or beef stock).

shepherds pie cut

Forming the Pie
Turn off the heat and flatten the mixture out. With a large ladel, place your mash potatoes on top carefully in dollops, trying not to allow the potatoes and meat base to mix. Take a fork, hold it mostly horizontal with the curve of the tines pointing down (like the bottom of a boat) and use this to spread the mashed potatoes around until it evenly covers the dish. I find that this allows you to spread the potatoes more delicately and thus prevents everything from mushing together. For aesthetics, I also like to use the tines of the fork to decorate the top with various patterns.

Place in the oven and bake for 30 minutes. Then turn on the broiler for a few minutes to brown the top, keeping an eye on it so it doesn’t burn. Let cool for 5 or 10 minutes, then serve.

A couple years ago, Lisl discovered that this goes really well with a side-sauce of ketchup and sriracha sauce mixed together evenly. If you don’t have Thai chili sauce, try Tabasco (if you like things spicy). This goes really well with a red shiraz or zinfandel, or a good beer.

Notes:
In the original recipe, the exact quantities of several things were slightly different. The other version also added 2 tsp of flour to the beef while cooking, used rosemary rather than oregano, and vermouth rather than white wine (I love cooking with vermouth), and included some beef stock. I started cooking this dish back in 2001 while we lived in London, and where “bacon” is more like what American’s call Canadian bacon; I’ll often use that instead of typical American bacon.

shepherds pie overhead
Yum.

Variations:
Shepherd’s Pie with a more middle eastern spice combination
Original Shepherd’s Pie recipe

Pork Shoulder Braised with Dried Chiles

pork serving dish
(part of From Provence to the Catskills, our celebration held as part of of the Foodbuzz 24, 24, 24 blog event)

The main course was inspired by Alice Waters, working off of a recipe in her fabulous cookbook The Art of Simple Food. While we diverged in several ways from Waters’ recipe, the biggest point of departure was that while Alice cooks her pork at 375F for about two hours, we did a longer, slower braise at lower temperature. I will have to say that this was one of the best braises I’ve ever made, and I’ll give equal credit to the flavor combinations and to the quality of the pork. We got our pork shoulder from Fleishers in Kingston, NY, which is an amazing butcher I’ve written about previously that only deals in grass-fed and organic meats.

Dry Rub (made the day before)
3 dried ancho chiles, with seeds and stem removed* (see footnote)
2 tbsp salt
2 tbsp oregano
1/2 tsp pepper
1 large bay leaf

1 6 lb pork shoulder, bone-in

Combine everything into a food processor and pulse until the chiles are reasonably chopped up.

pork shoulder

If you have a lot of excess fat on the pork shoulder, trim it down but do not remove it all as it will help the flavor enormously. As I was trimming some of the fat from my pork shoulder, I was imagining Josh Applestone leaning over my shoulder going “you’re killing me! that’s the best part!”

pork dry rub

Rub the spice and chile combination all over the pork shoulder, then wrap it up and place in the fridge overnight.

Braising the Pork

2 onions, coarsely chopped
1 carrot, coarsely chopped
2 dried ancho chiles, seeds and stems removed
1 dried chipotle chile, seeds and stem removed
1 head of garlic, peeled and coarsely chopped
8 black peppercorns
4 oregano sprigs
4 to 6 cups chicken stock**

Preheat the oven to 375F.

Combine the onions, carrot, chiles, garlic, peppercorns, and oregano in a large dutch oven and stir together. Nestle the pork shoulder fat-side down on top of the vegetables and then pour the stock** over the top – enough to reach a quarter of the way up the pork shoulder.

pork vegetables

Cover your dutch oven and place in the oven. After 15 minutes, lower the temperature to 320F. Cook for two hours. Every hour, check the pork and pour some of the broth over the top with a spoon (be careful not to burn yourself!). At this point, turn the pork shoulder over, lower the oven to 300F, re-cover and return the pot to the oven. Cook for another 2 1/2 hours, again checking the pot halfway through to pour some broth over top.

pork partially done

Remove from the oven. Place the pork shoulder on a large chopping board and lightly cover with aluminum foil while you create the gravy.

pork cooked

Making the Gravy
Using a large spoon, skim as much fat off the top of the liquid as you can. Then spoon the vegetables and a fair amount of the remaining broth into a food processor. Lightly puree and pour into a pitcher or gravy boat. The chipotle chile will give it a slight kick but not overwhelmingly so.

Remove the bones from the pork shoulder and “carve” — as much as one can carve meat that is falling apart so deliciously! Place the meat on a platter, lightly salt, and serve.

pork carving

pork gravy boat
To die for.

Footnotes:
* In keeping with our goal of using as much local ingredients as possible, I had dried a bunch of poblano peppers (which, dried, are called ancho chiles) several weeks ago when they were in season. I still ended up needing a couple extra dried ancho chiles and a chipotle chile from the market, but the effort was made! To dry your own peppers, place in the oven at around 175F all day long (and you might decide you need to let it go all night as well).

* In our case, we had a couple cups of homemade chicken stock in our freezer which I doubled by combining with a vegetable stock the day before, which was a simple combination of water, 3 carrots, 3 celery ribs, 1 onion, 3 large cloves of garlic, 2 bay leaves, several sprigs of thyme and a large bunch of parsley — all simmered together for several hours.

table eating main
We served this with a full-bodied red wine, accompanied by a shell bean ragout and some risotto wrapped in chard leaves.