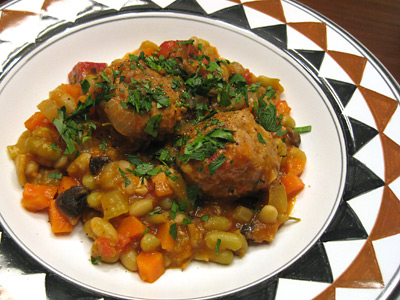
Flageolet and Meatball Peasant Stew


I love Autumn. I love the temperature, the colors, the clothes, and of course the fact that my favorite cooking style fits the weather more naturally. This recipe falls squarely into that bucket, and was a huge hit with Lisl and a friend who came over this evening.  It combines a homemade Italian meatball with a French-style peasant stew.

Meatballs
1 lb ground pork shoulder
1.5 tsp fennel seed
1 tsp kosher salt (halve if you use table salt)
1/4 tsp hot red pepper flakes
12 black peppercorns

Rest of Stew
1 lb dried flageolet beans (alternative: great northern)
1 large spanish or vidalia onion, diced
4 carrots, diced
3 celery stalks, diced
large handful of white button mushrooms, diced
1/2 to 1 cup diced tomato
3 or 4 cloves of garlic, minced
handful of parley
2 fresh rosemary sprigs
1/2 cup dry vermouth or white wine
1 tbsp tomato paste

Cook the flageolet beans until al dente: place in a large pot with 1″ of water above the top of the beans. Add 3 bay leaves, bring to a boil, then remove the lid and simmer. Soaking beforehand will speed up cooking time. While the beans cook, do the next few steps.

Pound up the fennel seed, peppercorns and pepper flakes with a mortar/pestle, then add to the ground meat along with the salt. Mix together then mold into meatballs about 1.5″ in diameter. Heat up your stew pot (I use a dutch oven) on med-high heat with a little olive oil and brown the meatballs. Then set them aside and turn off the heat.

Spoon out most of the oil left in the stew pot, leaving enough to coat the bottom. Turn the heat back on to med-low. Cook the onions until translucent, then add the garlic, celery and carrots. Cook for a few minutes, then add the diced tomato and mushroom.

Separate the parsley stems and leaves, setting the leaves aside. Create a bouquet garnis by tying the parsley stems, rosemary sprigs, and 1 bay leaf together with kitchen twine. Add the bouquet garnis to the pot, and continue to let the vegetables gently cook.

Once the beans are al dente, drain or optionally reserve the cooking liquid. Add the beans and meatballs to the stew pot, add the wine, and add either water or the bean cooking liquid until the liquid level is about three-quarters up to the top of the food. Make sure the bouquet garnis is immersed, cover and either place the pot in a 350F oven or let simmer on the stove top.

After 40 minutes, taste for salt and gently stir in the tomato paste.

Remove about 1/2 of beans and vegetables to a food processor and puree.  Return to the pot and continue to cook until the beans are soft and the flavors have melded.  This step improves the texture, thickening the stew (I hate the common use of flour or starch to thicken).

Chop up the parsley leaves waiting in the wings all this time. Serve with the parsley and a little fresh pepper scattered on top.
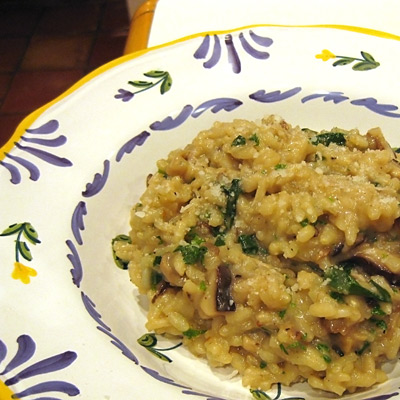
Ramp and Mushroom Risotto

risotto-mushroom

Every once in a while, you read amusing stories about the tension and strife that ensue when cooking in your mother’s kitchen. The hovering. The unsought advice. The skeptical brow. Unfortunately for you, dear reader, I have no such stories from this recent dinner. In the making of this ramp and mushroom risotto, I had free reign. Perhaps it is because I am male, or perhaps it is simply the nature of my mom, but there was no drama to rivet this tale.

I think we got most of the mother-child conflict out of our systems when I was in high school and needed heavy pushing to study and get into a good college. Her obstinate determination at that task exceeded even my own innate and not-insubstantial stubbornness. In the end, her mission was accomplished, for which I am eternally grateful.

Turning the tables and making her a great meal is the least I can do. This risotto, while not innovative in the slightest, was particularly good for three reasons: a homemade vegetable broth made with patience, the use of the last of my ramps, and a mix of porcini, shiitake and oyster mushrooms.

Continue reading “Ramp and Mushroom Risotto”

Spinach and Ricotta Gnocchi

I love gnocchi. I constantly order it at restaurants and yet until tonight I had not made it in over a decade. However, every time I see a gnocchi recipe my brain sings out, “must make!” I landed myself in a nice bundle of hot water earlier this year after passing on a complicated gnocchi recipe to my friend Becky — without trying it. She did try it, and let’s just say it was not a smashing success.

When I saw Elise’s Spinach Ricotta Gnocchi post on Simply Recipes, my brain did the same thing. And I said to Becky, “this one looks much better!” She said, “YOU get to try it first this time.” Fair is fair.

I ended up making the gnocchi and serving it with fresh asparagus, pancetta and to try something new, a vinaigrette sauce. However, this post is not really about the whole dish because while I like gnocchi and asparagus, and I like asparagus and vinaigrette, I didn’t think all three went together in a blog-worthy fashion. It wasn’t bad, but it was not great either. So goes experimentation. (See update below for a better approach)

The good news is that this time, the recipe is a good referral. Making gnocchi is not the fastest process in the world, but Elise’s recipe is really quite delicious and I am happy to have half of the dough still in the fridge so I can have another go with a more traditional sauce.

Here is a link to the full recipe, and below are a few notes:

1. Her ingredients call for nutmeg, but I didn’t see it mentioned in the description. To me, the logical place for addition would be mixed in the food processor with the egg, salt, spinach and ricotta.

2. I first tried mixing the “dough” with my hands (her step #2) but found it to be near impossible because it was so sticky. I ended up using a spoon for most of the process, and near the end using a spoon and my other hand.

3. While this could be because I had to eyeball 1.5 lb of ricotta, I found that the dough wanted a bit more flour to shift from being a sticky mass to being a bit more dough-like. I used about 2 full cups.

4. I recommend splitting the dough into 4 smaller portions, wrapping each separately in plastic wrap, and placing into the fridge for an hour before commencing with the gnocchi creation.

5. once the gnocchi float, let them cook for a 2 or 3 more minutes before removing to a baking tray to dry

UPDATE: I made a second batch of gnocchi and served with a sauce of mushrooms and shallots sauted in a few tablespoons of butter (yeah I know), with a little salt and pepper, and it was delicious.