Peasant Stew (a simple cassoulet)

simple-cassoulet

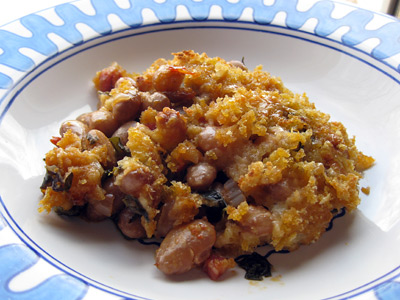
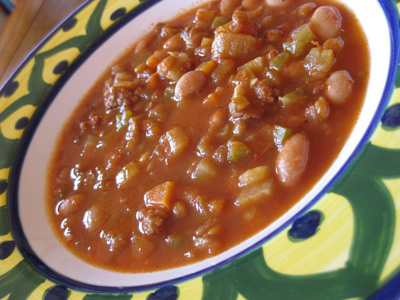
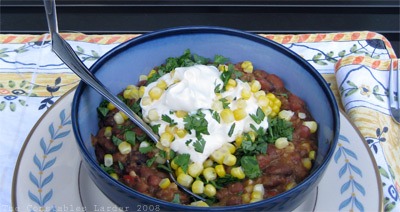
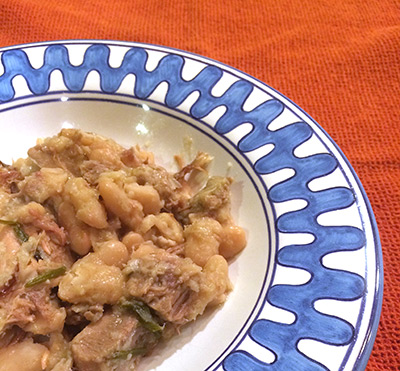
Fall brings braising back into my kitchen, and my favorite thing to braise is pork shoulder. Not only does it make a spectacular meal in it’s own right, but it gives you the perfect material for follow-on dishes, whether chili or tacos or in last week’s case, a cassoulet-inspired peasant stew.

There are a myriad of ways to braise pork. Two weeks ago, I did a dry rub of fennel seed, mustard seed, salt and black pepper, and braised the meat in white wine and onions for about 6 hours at 300F. This time around I did a simpler version of this chipotle port braise. For this recipe, I’m going to skip past the braising part and assume you have some delicious leftover pork shoulder to use.

1 lb braised pork shoulder meat
1 turkey thigh
1 kielbasa sausage
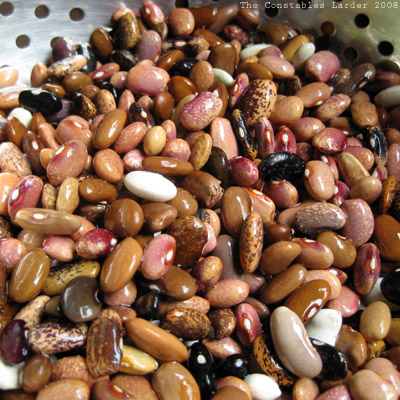
1 lb good white beans
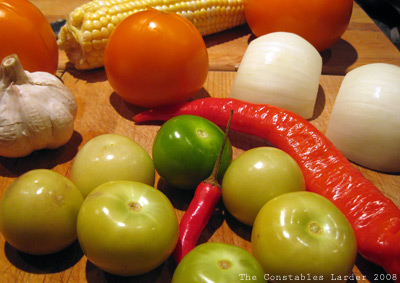
1 large onion, diced
3 or 4 cloves of garlic, minced
Salt and pepper
Bouquet garnis of parsley, oregano, bay leaf and rosemary

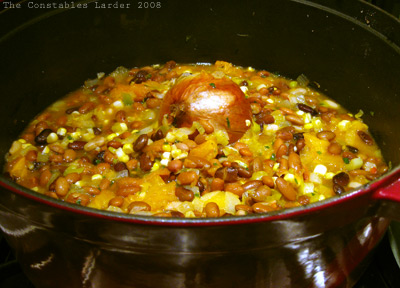
You’ll want a large dutch oven to make this dish.

For the cassoulet, soak and then cook a pound of white beans — in my case, I used Rancho Gordo cassoulet beans which had a lovely size and texture. To cook, put the beans in a large pot, cover with about an inch of water, bring to a boil and then simmer uncovered until the beans are tender. Reserve a couple cups of the cooking liquid.

Pre-heat your oven to 350F.

Sear but do not fully cook a turkey thigh. Remove the skin and cut the turkey meat into bite-size chunks.

If the kielbasa is pre-cooked, slice it into 3mm pieces. If it is not, brown the sausage in the dutch oven and then set to the side.

Chop the pork into bite-size chunks.

In the dutch oven, warm up some olive oil and saute the onions on medium-low heat until they start to turn translucent, and add in the garlic. Stir and do not let the garlic brown or burn. Gently stir in the beans, the meat (no need to do fancy layering), and the reserved cooking liquid from the beans. Stir in a half teaspoon of table salt or almost a full teaspoon if kosher salt. You will likely add more salt, but start here and add to taste.

Tie up your bouquet garnis with kitchen string (or wrap in cheesecloth) and push into the middle. Add water — enough that it comes almost to the top level of the beans (some white wine would be nice too).

Shift the pot, covered, to the oven. Cook for 20-30 minutes and lower heat to 325F. Cook for a couple of hours, tasting for salt level (just be careful that as the water level decreases, the salt intensity will increase). Sometimes with a dish like this, I will cook it uncovered to form more of a crust (with this approach, you will likely need to add more water), or I will add a layer of browned breadcrumbs, but I didn’t do either here and the dish still came out beautifully.

Flageolet and Meatball Peasant Stew


I love Autumn. I love the temperature, the colors, the clothes, and of course the fact that my favorite cooking style fits the weather more naturally. This recipe falls squarely into that bucket, and was a huge hit with Lisl and a friend who came over this evening.  It combines a homemade Italian meatball with a French-style peasant stew.

Meatballs
1 lb ground pork shoulder
1.5 tsp fennel seed
1 tsp kosher salt (halve if you use table salt)
1/4 tsp hot red pepper flakes
12 black peppercorns

Rest of Stew
1 lb dried flageolet beans (alternative: great northern)
1 large spanish or vidalia onion, diced
4 carrots, diced
3 celery stalks, diced
large handful of white button mushrooms, diced
1/2 to 1 cup diced tomato
3 or 4 cloves of garlic, minced
handful of parley
2 fresh rosemary sprigs
1/2 cup dry vermouth or white wine
1 tbsp tomato paste

Cook the flageolet beans until al dente: place in a large pot with 1″ of water above the top of the beans. Add 3 bay leaves, bring to a boil, then remove the lid and simmer. Soaking beforehand will speed up cooking time. While the beans cook, do the next few steps.

Pound up the fennel seed, peppercorns and pepper flakes with a mortar/pestle, then add to the ground meat along with the salt. Mix together then mold into meatballs about 1.5″ in diameter. Heat up your stew pot (I use a dutch oven) on med-high heat with a little olive oil and brown the meatballs. Then set them aside and turn off the heat.

Spoon out most of the oil left in the stew pot, leaving enough to coat the bottom. Turn the heat back on to med-low. Cook the onions until translucent, then add the garlic, celery and carrots. Cook for a few minutes, then add the diced tomato and mushroom.

Separate the parsley stems and leaves, setting the leaves aside. Create a bouquet garnis by tying the parsley stems, rosemary sprigs, and 1 bay leaf together with kitchen twine. Add the bouquet garnis to the pot, and continue to let the vegetables gently cook.

Once the beans are al dente, drain or optionally reserve the cooking liquid. Add the beans and meatballs to the stew pot, add the wine, and add either water or the bean cooking liquid until the liquid level is about three-quarters up to the top of the food. Make sure the bouquet garnis is immersed, cover and either place the pot in a 350F oven or let simmer on the stove top.

After 40 minutes, taste for salt and gently stir in the tomato paste.

Remove about 1/2 of beans and vegetables to a food processor and puree.  Return to the pot and continue to cook until the beans are soft and the flavors have melded.  This step improves the texture, thickening the stew (I hate the common use of flour or starch to thicken).

Chop up the parsley leaves waiting in the wings all this time. Serve with the parsley and a little fresh pepper scattered on top.

Chard and Cranberry Bean Gratin

chardplusgratin
It feels like forever since I’ve had a moment to write a post.  Interesting recipes have come and gone, never written down, photo-less, and unblogged.  Furthermore, it sucks not having the time to keep up with the blogs of all the friends I have made in the food blogosphere. Such is the nature of starting a company, Speaking of, please come over to Aprizi, try it out, and let me know what you think.  We just opened up a fledgling beta, and if you like shopping online and discovering cool new stuff, I hope you love what we’re doing.

OK, shameless plug complete! Let’s talk about this dish, which was a tad involved but oh so good.  Hearty vegetarian fare, although suited for a cooler evening.  It is inspired by Alice Waters’ Chard Gratin.  I just turned it into a meal. It has been a few weeks, but here is my best recollection of the dish:

Chard and Cranberry Bean Gratin

Large bunch of chard, leaves and stems separated
1 onion, diced
2 or 3 carrots, diced
1 stalk of celery, diced
1/2 lb of cranberry or borlotti beans
1 tsp fresh winter savory, finely chopped
salt and pepper
4 tbsp unsalted butter
3 tsp flour
3/4 to 1 cup milk
1 cup fresh breadcrumbs

I was working with dried cranberry beans. Put them in a pot with water an inch over the top of the beans, tossed in a couple bay leaves, brought to a boil for a couple minutes, then let simmer until just tender (time will depend on whether you soaked beforehand). Save 1/2 cup of the cooking liquid and drain the rest.

Make breadcrumbs by placing stale or fresh bread in a food processor. Spread them out on a baking tray, dot with pieces from 1 tbsp of butter, and toast in a 350F oven until lightly golden.

carrots

Bring a large pot of water to a boil and cook the chard leaves for about 3 minutes, then remove with a slotted spoon and let them drain and cool.  Dice the chard stems and cook them in the boiling water for 5 minutes, then drain.

Melt 2 tbsp of butter in a large (ideally oven-capable) skillet and saute the onions on low heat until translucent.  Add the carrot and celery and continue to cook for 10 minutes.

chardplusgratin-inprocess

Add the beans and the bean liquid and/or some white wine, and continue to let it simmer (turn up the heat a tad, if necessary), stirring occasionally.

Squeeze much of the excess liquid out of the chard leaves and coarsely chop them.  Add the chard stems and chard leaves to the skillet.  Add the winter savory (Note: I think oregano or tarragon would also work).  Let simmer for a few minutes.

Sprinkle and stir in the flour, then stir in the milk.  Cook for 5 more minutes, adding more milk if the mixture gets too thick. Add salt and pepper to taste.

If you are not using an oven-friendly skillet, transfer to a baking dish.  Spread the breadcrumbs on top, dot with bits from the last tbsp of butter, and bake for 30 to 40 minutes in the 350F oven.

Pancetta, Chard, Cranberry Bean and Gouda Gratin

I spent last week in San Francisco and missed my kitchen, although I did have a few good meals with friends, colleagues and even the Foodbuzz editorial team. Hence today I felt the need to get in the kitchen and prep a civilized lunch for a cool spring day. This cranberry bean gratin emerged out of the available ingredients, and we happily polished it off with a glass of white wine. I decided it is a keeper (even our 3-yr old loved it), so the recipe is below.

Meeting the Foodbuzz team was great fun (that’s me second to the left). We ate lunch on the water at La Mar and had some great peruvian-style seafood dishes. I continue to be impressed with the passion of the Foodbuzz team, and they are all super-nice people. I enjoyed our conversation about the food blogosphere, the rise of twitter among food bloggers, and the changing Foodbuzz site itself, and look forward to seeing their business grow and evolve.

lunch w foodbuzz team

Pancetta, Chard, Cranberry Bean and Gouda Gratin

0.15 lb pancetta (one thick slice), diced
1 medium onion, chopped finely
4 small cloves of garlic, minced
large bunch of swiss chard (instructions below)
2 medium tomatoes
1/3 cup white wine
1/3 cup reserved bean cooking liquid
1 tsp tomato paste
1 to 2 cups fresh or soaked cranberry beans
3/4 cup fresh breadcrumbs
3/4 cup grated gouda cheese
2 tbsp unsalted butter
several sprigs of thyme
olive oil
salt and pepper

Place the cranberry beans in a large pot, fill with water an inch above the top of the beans, and add 1/4 tsp of salt, 1 bay leaf, and 2 sprigs of thyme. Bring to a boil then lower to a gentle simmer. Cook uncovered until tender (start checking around 20 minutes). Reserve about 1/3 of a cup of the cooking liquid, drain and set aside.

Pre-heat oven to 375F.

Prep the chard by washing the leaves and removing the stems, discarding all but two of them (keep the two firmest, freshest stems). Chop the leaves, and thinly slice the two stems.

Grab a big hunk of country bread (stale or fresh), remove the crust, and turn into breadcrumbs in a food processor.

In an oven-ready large skillet (I like to use cast-iron), heat up a splash of olive oil and cook the diced pancetta on medium heat for 2 minutes. Lower the heat to medium-low and add the diced onion, and cook until the onions turn translucent. Add the chard leaves, chard stems, minced garlic, a splash of olive oil and a pinch of salt. Cook until the chard leaves are wilted, and then stir in the cranberry beans, chopped tomatoes, white wine, reserved bean liquid, and about 1/4 teaspoon of fresh thyme leaves. Cook for 5 to 10 minutes, stir in the tomato paste and 1 tbsp of butter, taste for salt, and cook for 10 minutes more.

Turn off the heat. Sprinkle a mixture of breadcrumbs and grated gouda cheese on top. Cut a tablespoon of butter into small pieces and sprinkle around the top. Place in the oven for 20 to 30 minutes. If the top is not browned, you can finish it off with about 30 to 60 seconds under the broiler.

cranberry bean gratin

I am going to submit this to My Legume Love Affair, one of my favorite blog events (run by Susan of The Well-Seasoned Cook) — this month being hosted by Mediterranean Cooking in Alaska.

Smoky Legume and Sausage Soup

The blog has been pretty quiet lately because the evul-death111 cold/flu plague struck and struck hard, and I stopped cooking for a couple of weeks. It’s nice to be back! Of course, I warn you that we will probably disappear again for a bit, since kiddo #2 is expected literally any day now. Tick tock. I have totally forgotten what the first six months are like with a baby, which is nature’s way of encouraging humans to have more than one child. And if our English starts looking like we not only didn’t sleep, but also failed our first grade equivalency test, just blame it on that state of self-induced mania called parenthood.

This soup was the first thing I made when it was clear that I was not going to turn into a zombie and spend the rest of my days lurking around malls and B-movies. It ended up being an interesting merge of a soup bubbling around in my brain and a recipe by Joy Manning posted on Serious Eats.

Smoky Legume and Sausage Soup

1 smoked pork chop or ham hock
1/3 lb ground pork shoulder
1/3 tsp fennel seed
pinch of hot red pepper flakes
1/2 coarse salt
1/4 lb dried cranberry beans
1 cup dried green lentils
1 yellow onion, chopped
1/2 green pepper, chopped
3 carrots, chopped
2 celery stalks, chopped
1 fennel bulb, chopped
3 large cloves of garlic, minced
1 tbsp tomato paste
1 cup crushed tomatoes
1 rind of parmesan cheese
1 bay leaf
3 cups of chicken stock
4 cups of water

Soak the cranberry beans for several hours in cold water before starting the soup.

Heat up a splash of olive oil in a large soup pot on medium-high heat and brown the smoked pork chop on both sides, then remove to a side plate. Place the ground pork into the pot, along with the fennel seeds, red pepper flakes, and 1/2 tsp of salt, and brown thoroughly. Remove to the plate with the pork chop.

Lower the heat to medium and place the onions in the pot and cook until they start to turn translucent, stirring and scraping the bottom of the pot. Then add in the green pepper, carrots, celery, and fennel and cook for 20 minutes. Stir in the tomato paste and cook for another 5 minutes.

Stir in the rest of the ingredients: cranberry beans, lentils, garlic, crushed tomatoes, pork chop and ground pork, parmesan rind, bay leaf, chicken stock and water. Bring to a boil and then reduce heat to a light simmer. Simmer for an hour or two and check the tenderness of the cranberry beans. Adjust for salt and pepper.

Notes: if you want to thicken the soup, you can remove a couple ladle-fuls to a food processor and puree, then add back into the soup. I do not recommend using an immersion blender for this step, because you don’t want parts of the soup partially blended.

You can keep on cooking this soup for hours, and like most soups, it is really good the next day. I just ate it with some good bread, but you can also try it with a little olive oil or balsamic vinegar drizzled on top.

smoky legume soup

Vegetarian Chili

The first project with my Rancho Gordo beans was a vegetarian chili using some of the fresh vegetables from the farm stand. This is another “get it all in the pot and let it cook for a while” dish. For this project, I used the Pebble beans, and of course you can use other, more commonly found beans (a common mix is kidney, pinto and great northern). The colors were a wonderful mix of browns and oranges — it was like Fall in a pot.

Vegetarian Chili

Serves 4 – 6, depending on bowl size 😉

1 lb pebble beans (or other bean mixture)
3 medium tomatoes
7 or 8 tomatilloes
2 red hot chili peppers
2 hot cayenne peppers (if available, otherwise use red chili peppers or jalapenos)
2 ears of corn (1 for chili, 1 for garnish)
2 onions (1 left whole, 1 chopped)
4 scallions, chopped
4 cloves of garlic, minced
2 bay leaves
2 tbsp ground cumin
2 tbsp fresh oregano, chopped (or half as much dried oregano)
salt
cilantro
natural greek yogurt

chili - ingredients
Just a few of the ingredients

Prepping the beans
Rinse and quickly pick over the beans to remove cracked beans or small stones. Soaking is optional (just requires longer cooking), but beans are easier to digest if you bring them to a boil for a couple of minutes, then turn off the heat to let them soak for over an hour. When done soaking, drain and rinse in a collander.

chili - beans
Rinsed Pebble beans, pre-soaking

Cooking the beans
Peel off the roughest outer layers of an onion and poke a few holes in it with a knife, making one large enough to insert a bay leaf. Place the rinsed beans and onion in a heavy bottomed pot (I like using my cast iron dutch oven), fill with cold water about an inch over the tops of the beans, and bring to a boil. Once the water is boiling, reduce to a simmer and cook for 45 minutes or so. Save at least 4 cups of the cooking liquid, and then drain the rest, putting the beans to the side in a bowl.

Cooking the Chili
Preheat the oven to 280F.

Chop up the onion and scallions, mince the garlic, and saute in the dutch oven on medium-low heat with a little bit of olive oil. If you have time to skin and de-seed your tomatoes, do so, then roughly chop them up and add to the pot. Remove the husks from the tomatilloes, dice, and add to the pot. Cut the kernels of an uncooked ear of corn and add to the pot. Add the oregano and ground cumin, 2 tsp of salt, and 2 of the hot peppers, minced. Finally add in the beans and a cup of the bean-cooking liquid, and mix it all together gently. As you will see in the below picture, I also kept and added the whole onion from cooking the beans.

Cover and place in the oven.

chili - cooking

At this point, you can cook on low heat for as long as you have (or can bear), but at least another hour. Check every 30 – 45 minutes and add more of the bean-cooking liquid if it is looking dry. I probably ended up adding at least two cups of liquid. About an hour in, I removed the whole onion and added a fresh bay leaf. Continue to taste for the desired balance of cumin, salt and heat from the fresh peppers, and adjust accordingly. I used 2 red chili peppers and 2 fresh cayenne peppers, but with fresh peppers heat can really vary so treat carefully if you have a sensitive palate. When you add more heat, let it cook until your next checkpoint before tasting again and adding.

Depending on your desired texture and aesthetics, if you want to thicken up the chili, put one or two large spoonfuls of the chili in a food processor and roughly puree, then stir back into pot. (Note: it isn’t quite as pretty if you do this, but you do a get a wonderfully thick “comfort food” texture.)

Before serving, chop up some fresh cilantro and cook an ear of corn (method of cooking is of no matter – I microwaved it still in the husk for 2.5 minutes) and cut off the kernels. Add a dollop of yogurt (or sour cream) to each bowl and garnish with the fresh corn kernels and cilantro. Other nice garnishes are diced sweet red pepper, grated cheese, and diced red onion. It can be fun to serve each garnish in an individual bowl so your eaters can take their pick.

chili - served

Additional notes:
Using the oven isn’t necessary, but I find that it reduces any risk of burning at the bottom of the pot (a handy thing if you get tied up by, say, a mischevous 3 year old and forget to check on it for a bit) and makes it easier to keep the chili at a low simmer. In my case, I actually started the chili yesterday evening and left it in the oven with the heat turned off when I went to bed (while placing the extra bean-cooking liquid in the fridge). When I woke up, I added some more liquid to the pot, brought it all to a boil again on the top of the stove, and then placed back in the oven for a few more hours.

If you don’t have fresh hot peppers, you can use chili powder, but remember to start light (say, a tsp or two) and build up to the desired heat level, and you might also scale back the garlic, cumin, and oregano since chili powder is a mix of spices.

Finally, those of you who have been reading this blog are picking up that I am more about country/peasant/comfort food than haute cuisine. While I had to resist mightily from adding any meat to this chili dish, it came together well and was a filling and truly delicious meal.