On Joining the Foodiesphere; Recipe Links

I’ve been actively involved in the social media / virtual worlds blogosphere for a number of years for work, but am a total noobie to the foodiesphere. I have to say that it has been a joy to explore and join. There are some wonderful people out there, not just in terms of the quality of their food, photographs and culinary ideas, but also in terms of friendly, community spirit.

I’ve also noticed that there’s a lot of folks in the foodiesphere who are really into baking, and even more into desserts (which I almost never make, but they do make for awfully nice food photos).

Part of my exploration consists of working my way through various blogrolls, and accordingly a whole new “food” category has been growing in my RSS reader. I have also enjoyed discovering foodbuzz.com, and have slowly been getting the hang of it. My interactions with the FoodBuzz staff have been very positive — they seem to truly care about building the community, which strengthened my desire to participate more actively.

As I run into great recipes from other foodies, I am going to save links here so that I can find and try them in future:

Eggplant Parmesan, and risking the ire of M. Hazan

Marcella Hazan wrote on eggplant parmesan, “Perhaps some cooks find it too commonplace to attract their attention, but at home I have never stopped making it.” Hear Hear!

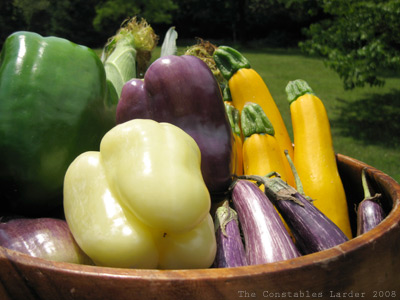
I knew that there would be no time last night to make dinner, so the day before I prepped this simple dish with these lovely baby eggplants.
Eggplants
With large eggplants, you normally lop off the green top, then slice the eggplant lengthwise about 3/8 inches thick. Goddess Hazan (G.H. for short) recommends peeling them first, and also seeping the eggplant for 30 minutes with a sprinkling of salt (standing them up in a colander), then patting them dry. For her eggplant parm, G.H. handles her components separately. She coats the eggplant slices in flour and then fries the slices in 1 1/2 inches of olive oil. She cooks her tomatoes separately, and just does multiple layers of eggplant, tomato, cheese, basil, until the last layer of eggplant upon which she finally puts a layer of cheese and pops in the oven at 400F for 35 minutes.

Don’t tell G.H., but I cheated and skipped all of that. I just took off the tops of the baby eggplants and placed in the baking dish whole and uncooked (they ended up looking like little squids, so perhaps if you are trying to feed this to an imaginative 10 yr old, you might cut them in half). I made a tomato and basil sauce rather than layering individually.

My independent streak might not serve me well with G.H., but perhaps she’ll bless me for using tinned plum tomatoes. But wait, on tomatoes, GH also says, “When buying canned tomatoes, if one has a choice one should look for whole, peeled plum tomatoes of the San Marzano variety imported from Italy. They are the best kind to use and, if possible, settle for no other.” Oh dear. I DON’T REMEMBER. I mean, I THINK they were Italian but San Marzano? and what if something else was on sale? Noooooooooooo!

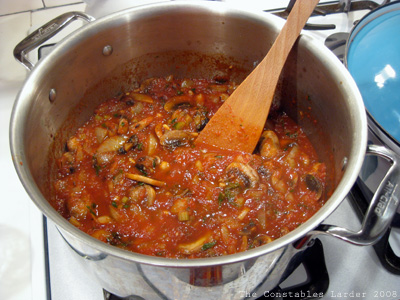
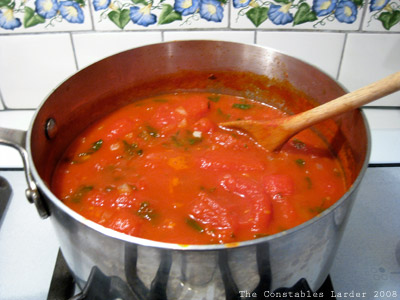
Moving on before I get struck by lightning: I whipped together a very simple sauce. I chopped up a medium yellow onion and sauted it in a saucepan with a dash of olive oil until translucent, then added two whole tins of skinned plum tomatoes, a couple tablespoons of olive oil, about a tablespoon of salt, a teaspoon of cayenne pepper, a few grindings of fresh pepper, and two large handfuls of basil, loosely chopped. I brought this to a boil then let simmer for about an hour, stirring gently so as not to break open the tomatoes until the very end when I turned off the heat and chopped up the tomatoes using my wooden spoon (they are so fragile at this point they break up pretty easily).
eggplant-parm-sauce

Tomato Sauce
2 tins whole, skinned, plum tomatoes
1 yellow onion
1 tbsp salt (but really do this to taste)
1 tsp cayenne pepper (or chili powder)
2 large handfuls of fresh basil, chopped
ground pepper
olive oil

I placed the eggplant in a baking dish and spooned half of the sauce around them. Then I scattered a generous layer of grated parmesan cheese and grated mozzarella cheese. As you’ll see in the below picture, I ended up getting impatient with grating and just layered a few more slices of mozzarella.
eggplant-parm-layer

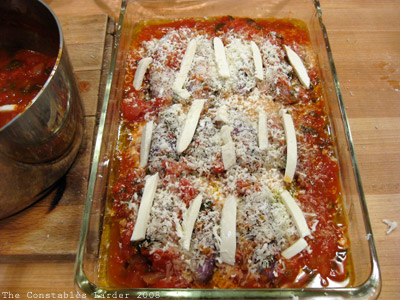
The final step was to put a layer of the rest of the tomato sauce on the top and pop into the oven for an hour at 350F. I let it cool, popped it into fridge, and reheated the next night for a quick, painless, and delicious meal. Commonplace and basic? No doubt. Satisfying? Unquestionably.

Pickled Red Onions (improvised)

pickled red onions
Flipping through a back issue of Bon Appetit (July 2003), I came upon a recipe for “pink pickled onions” that I just had to try. The magazine called for pickling spices and fresh rosemary, neither of which I had at hand, so I improvised the following adaptation working within the limits of my spice cabinet that day, sticking with spices that could be strained out (i.e. not ground).

1 red onion, sliced thin into rings
1 cup white wine vinegar
3/4 cup water
1/2 cup sugar
1 tbsp dried rosemary
1 tbsp salt
1 cinnamon stick
1 tsp cloves
1 tsp cumin seeds
1 tsp whole black peppercorns
2 dried bay leaves

In a medium saucepan, add the vinegar, water, sugar and all the sprices and bring to a boil, stirring until the sugar and salt dissolve. Reduce heat and simmer, covered, for about 10 to 15 minutes. Place a metal bowl underneath a fine strainer and pour the liquid through the strainer so that the spices are removed. Push the sliced red onions into the liquid in the bowl and let cool.

I had hungry hordes to feed (ok, only my wife and daughter but when they are peckish, even Genghis would run for cover), so I let sit for just under an hour while I prepped the rest of dinner. You can also cover and place in your fridge for longer.

P.S. dinner consisted of sandwiches made out of grilled, spicy (chorizo-based) sausages (sliced) which could be swapped out for vegetarian sausages (in that case, I would recommend adding a little kick like Thai chili sauce), the pickled onions, chopped romaine lettuce and natural greek yogurt as a condiment. I wished I had some Cuban black beans to serve with it.

Trice the Fool (Gooseberry, Blackberry and Ginger Snap Fool)

gooseberries.jpg
Walking through the Kingston farmers’ market, we came across a stand with pink and green gooseberries, which I had never tried before. The stand-keeper (for lack of a better name) was kind enough to let me taste them. Both were delicious but the pink were a nice blend of sweet and tart so I bought a punnet and then went rummaging around for a way to use them. Lo and behold we discovered the “gooseberry fool”, which was a marvelous sounding dessert as long as our 3-year-old did not take to heart the expression “fool on me? no, fool on you!

I ended up referencing two sources (this vegan recipe I found through FoodBuzz, and this recipe I found on Epicurious), but not exactly following either. The results were great, however.

Recipe (enough for 4 servings):
1 punnet of pink gooseberries
1/2 punnet of blackberries
2/3 cup of heavy cream
3 big tablespoons of creme fraiche
1/4 cup granulated sugar
1/4 cup superfine granulated sugar
ginger snap cookies
fresh mint leaves
2 tbsp unsalted butter

1. Remove the tops and tails of the gooseberries (you can see them in the top photo) using scissors or pinching with your fingernails. Then cut the berries in half. In a medium saucepan, cook the gooseberries and blackberries over medium-low heat with 1/4 cup of sugar, stirring constantly and then mashing up the berries thoroughly with a fork once they began to soften. Cook this puree for about 7 or 8 minutes, then remove from heat to cool in a small bowl, then cover and place in the fridge to chill.

2. In a large bowl, whip the heavy cream and creme fraiche until slightly stiff, then add the 1/4 cup superfine sugar and continue whipping until the mixture can hold stiff peaks (I used an electric beater to speed things up). Then fold in the berry puree.

3. Take a large handful of ginger snaps and pulse them in a food processor until you have smallish crumbs. Melt the 2 tbsp of butter and combine butter and crumbs in a bowl and stir around until well mixed together.

4. Take a big handful of mint leaves and loosely chop them up.

5. In your serving glass (or bowl), put down a layer of the “fool” (cream and berry mixture). Loosely scatter a thin layer of of chopped mint leaves. Then add a layer of the ginger snap crumbs. Repeat once more and garnish with some mint leaves.

Gooseberry Fool
The picture above shows a version without the layers of chopped mint leaves, since I tried it this way first and took the picture. I quickly decided that it needed more of a mint kick and the results proved out that theory. The blackberries brought out the incredible pink color.

P.S. I also just found an interesting version at Delia Online with natural yogurt that sounds delicious (hat tip to Foodycat for link to Delia).

Weekend in the Caskills (Caprese, Grilled Pork, Produce)

The local produce has emerged in New York’s Catskills mountains. This weekend we hit our favorite farm stand and popped up to Kingston to visit the farmers’ market and a favorite butcher. For any New Yorkers reading, I should note that Kingston’s market is useful for a few interesting items like zucchini blossoms, gooseberries, and fresh mozzarella, but for your typical farm produce, it is expensive and sadly of mixed quality (that’s not to say there isn’t good stuff to be found, just be choosy). For wonderfully fresh produce, we go to a farm stand located at the back of Gill’s Farm in Hurley NY, right off their fields.
Gills Farm Stand
We walked away with a ton of veggies and an enormous armful of fresh basil for making pesto, some of which Lisl used Saturday night to make her fried zucchini blossoms (the subject of another blog post).
Summer Veggies
Summer Fruit

Hot, humid weather inspires a simple, cool lunch — in this case, a Caprese salad, with slices of tomato, fresh basil, mozzarella, and drizzlings of olive oil, balsamic vinegar and salt and pepper.
Caprese Salad

While we were in Kingston, we stopped by our favorite butcher shop, Fleishers, which not only has the most amazing grass-fed and organic meats, it is also run by the nicest couple (and I just learned they hit the Saveur “Top 100” list for 2008). I purchased two porterhouse pork chops and let them spend the day marinating in the fridge covered in olive oil, white wine vinegar, white wine, grain mustard, and a scattering of fresh oregano, salt and pepper.

Grilling Pork
I grilled them that evening to excellent effect, and while I’d like to give my marinade and grilling skills much of the credit, I think it really belongs to the Berkshire (aka Kurobuta) pork that Fleishers carries.

Wax Beans

The full dinner menu ended up being fried zucchini blossoms to start, then a main course of grilled pork, corn on the cobb (nothing like freshly picked corn), and wax beans (boiled for three minutes then tossed with some butter, fresh oregano, and salt/pepper). We served it with a chilled Malbec Rose from Crios, which I highly recommend.

Yogurt-based Dressing

Yogurt-based dressing
Something about tonight’s heat and humidity made me crave cool flavors. The meal I whipped up was pretty simple: a London broil marinated in sesame oil and soy sauce, then grilled, and a salad of Romaine lettuce, cucumber (cut into strips), ripe tomatoes, and peelings of Manchego cheese with a yogurt-based dressing (with a nice Rose wine).

Lisl has a contraption she brought over from Australia that allows you to make natural yogurt at home (it is so much better than most yogurt available in the supermarket). I started scooping small portions of yogurt into a bowl and tasting different flavor combinations. Among the experiments, the uses of salt or soy sauce were total dead ends. I liked the base mixture of yogurt and Sriracha chili sauce (need only a touch), but in the end my favorite was a more Greek-style dressing:

I mixed two tablespoons of natural yogurt, 3 pinches or so of season salt, several pinches of dried oregano, a touch of olive oil (measurement-wise I would guess about a half a tsp) and some ground pepper. I wished I had a lemon handy because I think some lemon juice would have been a great addition.

Rhubarb Crumble

rhubarb crumble
Our neighbor has successfully fended the deer off her garden and accordingly bestowed an armful of rhubarb stalks on us the other day (yeah, twist my arm). So when I spotted a rhubarb recipe on Food Blogga, Triple Berry Rhubarb Crisp, I immediately sent it Lisl’s way since she is the crumble queen in this household. Part of the confusion over name comes from nationality issues — what Americans call a crisp, the Aussies and Brits call a crumble (the topping usually has oatmeal, brown sugar and butter, and sometimes nuts).

I was assigned the task of putting together the crisp topping. That is about as close as Lisl will let me get to baking, since I am normally unable to follow cooking directions without veering off into new directions (or over the cliff). We were missing shredded coconut, almonds, and ground ginger, but replaced the almonds with walnuts and the result still came out great.

Lisl also had to do an ingredient swap, as we discovered we did not have corn starch in the kitchen, so she used a very small amount of flour. The fruit filling ended up a little more runny than Lisl wanted, but that was purely an aesthetic issue — the taste was fabulous, and went perfectly with some vanilla ice cream.

I won’t elaborate on my own food experiment tonight. Let’s just say that surely even Richard Blais had disasters on his way to discovering great new flavor combinations! That’s what I’m going to tell myself anyway.

Peas in a Pod


Today was one of those up-crack-of-dawn at work mayhem days, followed by a slew of family errands, so a nice dinner was definitely not in the cards. Still, I was able to pause for a moment or two with my three year old and teach her the fine art of eating sugar snap peas.

When I was little, I loved to crack open the pea pods and nibble out the peas — a fabulous confluence of tactile and taste. It was fun to see Audrey happily sitting up on her chair eating peas with Daddy and enjoying the fruits (dare I say vegetables?) of sharing and discovery. And of course, when patience runs short with pod cracking, there’s always the crunch crunch crunch of downing the whole thing!

Shrimp and Bacon Tortilla Rolls

Shrimp Rolls
Tonight I decided to try an experiment of stuffed shrimp, bacon and cheese tortilla rolls. The following amounts made about 12 rolls.

40 medium-sized shrimp (cleaned and de-veined)
6 strips of thickly cut bacon
2 shallots
two handfuls of fresh cilantro
1/3 pound of monterey jack or cheddar cheese
2 limes
Black pepper
12 flour tortillas (6″ in diameter)
Canola Oil
Wooden toothpicks

1. In a large frying pan, cook your bacon until it is cooked but not yet crispy. Remove to a plate with a piece of paper towel to soak up excess grease.

2. In the bacon fat and while the pan is still quite hot, saute your shrimp cooking both sides for a minute or two until the shrimp loses its translucency. Remove from pan, loosely chop, and place in a medium bowl.

3. Finely chop the shallots and saute in the bacon fat on low heat for a couple minutes until they start to turn translucent. Remove and add to bowl (pour out any extra bacon fat that comes with the shallots). Then chop up your bacon and add to bowl.

4. Loosely chop up your cilantro (can never have too much fresh cilantro in my opinion) and add to bowl. Chop your cheese into small cubes (1/4 inch) and add to bowl. Finally add a touch of freshly ground pepper and the juice of a lime, and mix all the ingredients together.

5. Before you create your rolls, you want to warm up the tortillas so that they don’t split during the rolling process. At burrito shops, I have seen them use a kind of steamer, but at home I just warm them one at a time in a medium sized frying pan big enough to hold the 6″ tortilla, on low heat.

6. Take a warmed tortilla, and add a couple spoonfuls of the mixture to the bottom third. Fold over the bottom, then fold in the two sides, then continue the rolling process with the sides tucked in. Try to keep it fairly tight, and once you have complete the roll process, keep the shape in place with two wooden toothpicks (the toothpicks are essential, or the rolls will unravel when you cook them – in the bottom picture you can see the holes where the toothpicks went).

7. In a medium saucepan, heat up about an inch or two of canola oil until very hot. Add your tortilla rolls in batches and cook until they turn golden brown. Remove the tortillas with a slotted spoon or pair of tongs, and place on paper towel to pick up excess oil.

8. Remove the toothpicks and serve with slices of fresh lime

Notes: The next time I try this, I want to try to get my hands on some Chinese spring roll wrappers which would be thinner than the tortillas (which have the advantage of being available in most supermarkets). You can also experiment with creating a dipping sauce — I can imagine continuing in the lime/cilantro vein or going in a sour cream/yogurt direction. Lastly, the next time I do it, I might try not chopping ingredients as much but rather layering them more neatly in the rolls (thin strips of bacon and cheese, for example, and leaving the shrimp whole).

Shrimp Rolls

Pasta sauce with homemade milled tomatoes

Tomato Sauce
A few months ago, some friends of ours from Harrison, NY, gave us a jar of homemade stewed tomatoes. Apparently every year, a group of Italian women in the neighborhood (our friend’s mother being one) buy a huge quantity of tomatoes, mill them to de-seed and de-skin, stew, and then preserve in sterilized glass jars with a sprig of basil. Note: I’m hoping to get a more detailed description of this process to post in the next day or so (Update: description posted here).

On Monday evening we decided to crack open the jar and taste. I can only describe my taste bud reaction as “holy moly!” It had to be the sweetest tomato flavor I’ve ever had. Well, after this moment, my goal could only be to use this as the base for a pasta sauce without distracting too much from the incredible core flavor.

1 jar of stewed tomatoes (see below)
1 vidallia onion, chopped
1 and a half stalks of celery, chopped
2 cloves of garlic
8 oz white button mushrooms, cleaned and sliced
handful of parsley, washed and chopped
virgin olive oil
salt and pepper

I started by heating some olive oil in a big pot on low heat, and then sauteing the onions and garlic until the onions started to turn translucent. I then added the mushrooms and sauted, stirring occasionally, until the mushrooms were cooked and exuding their juices. I tossed in the parsley and celery, a pinch of salt and some ground pepper (I kept the salt light because the natural flavor of the tomatoes was so good), and let cook for a couple more minutes.

Normally I would also add wine or vermouth at this stage but it just wasn’t needed here. I then added the tomatos, turned up the heat slightly to bring everything to a light simmer, and cooked for about 30-60 minutes stirring regularly. We served this with farfalle pasta (campanelle would have worked nicely too) and a d’Arenberg Footbolt Shiraz.

Now, the tomato sauce we used as a base is obviously not something you can run out and get. Normally I use tins of peeled Italian tomatoes, and to be honest I rarely take the step to deseed the tomatoes (usually due to time considerations). Jamie Oliver also tends to leave the seeds in, and takes the approach of letting the tomatoes cook whole (i.e. he does not cut or break them up) with the sauce for a while and only breaking them up and letting the seeds out into the mix near the very end.

Many cookbooks talk about how tomato seeds can add slight bitterness. I had never really felt this to be enough of a problem to take the time, but if you want to try working with canned, peeled Italian tomatoes without the seeds, it’s a relatively easy, if slightly messy, step. To preserve most of the juices, I recommend working in your sink with a strainer over a bowl. Take each tomato, break it open in the middle with your fingers (they will be very soft), and let the seeds run out, gently scooping out any recalcitrant ones. Let the juices flow into the bowl, save the tomato flesh (can just put in the same bowl), and toss out the seeds in the strainer.